St. Patrick’s Day Mint Chocolate Bark

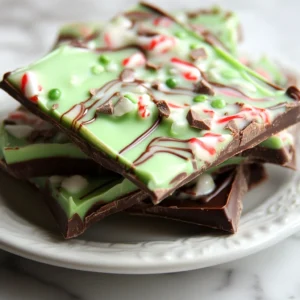
Description of this recipe: This St. Patrick’s Day Mint Chocolate Bark is a delightful and visually stunning treat, perfect for celebrating the festive holiday. It features a rich, smooth dark chocolate base swirled with a vibrant, peppermint-infused green white chocolate layer, all topped with a generous sprinkle of crushed peppermint candies. It’s a simple recipe that yields an impressive result, combining rich chocolate flavor with a refreshing minty kick.
Why you will love this recipe: You’ll love this recipe because it’s incredibly easy to make and requires minimal baking skills. The bark comes together quickly, making it an ideal choice for last-minute celebrations or a fun project with kids. It’s also a crowd-pleaser; the combination of dark and white chocolate, along with the refreshing peppermint flavor, is sure to satisfy everyone’s sweet tooth. The beautiful marbled effect and festive green color make it a visually appealing treat that’s perfect for gifting or serving at parties. Plus, the crunchy peppermint topping adds a delightful textural contrast to the smooth chocolate. This bark is not only delicious and easy to make but also customizable to your preferences, allowing you to adjust the amount of peppermint extract or even add other toppings like sprinkles or chocolate chips.
Introduction
St. Patrick’s Day is a time for celebrating all things Irish, and what better way to join in the festivities than with a homemade treat? While green beer and corned beef get a lot of attention, this St. Patrick’s Day Mint Chocolate Bark offers a sweet, visually stunning, and incredibly easy alternative. This recipe takes the simplicity of chocolate bark and elevates it with festive colors and refreshing flavors. The combination of rich dark chocolate and creamy, peppermint-infused white chocolate creates a balanced and delightful treat that’s perfect for sharing (or keeping all to yourself!).
This bark isn’t just about taste; it’s also about the visual appeal. The vibrant green swirls against the dark chocolate create a mesmerizing marbled effect that instantly catches the eye. Topped with crushed peppermint candies, it’s a festive treat that embodies the spirit of St. Patrick’s Day.
Whether you’re hosting a St. Patrick’s Day party, looking for a fun activity to do with your kids, or simply craving a sweet treat, this Mint Chocolate Bark is the perfect solution. It’s easy to customize with your favorite toppings and variations, ensuring that each batch is unique and tailored to your taste. It’s also a great gift idea for friends and family who appreciate homemade treats. The best part? This recipe requires no baking, making it accessible to even the most novice cooks. Just melt, swirl, sprinkle, and chill – it’s that simple!
Ingredients:
- 12 oz dark chocolate, chopped: Use a good quality dark chocolate with a cocoa content of at least 60% for a rich, intense flavor that balances the sweetness of the white chocolate. Chopping the chocolate ensures it melts evenly and smoothly. You can also use dark chocolate chips if preferred, but chopped chocolate melts more evenly.
- 12 oz white chocolate, chopped: Opt for a high-quality white chocolate to avoid a waxy texture. Just like the dark chocolate, chopping the white chocolate will help it melt evenly. White chocolate chips can be substituted, but using a bar of white chocolate and chopping it will give a smoother and better result.
- 1 tsp peppermint extract: Peppermint extract is what gives the white chocolate its refreshing, minty flavor. Be careful not to add too much, as it can easily overpower the chocolate. Start with a teaspoon and add more to taste if desired. High-quality extract will provide the best flavor.
- Green food coloring: Gel food coloring is recommended over liquid food coloring because it’s more concentrated and won’t affect the consistency of the chocolate. Start with a few drops and gradually add more until you achieve your desired shade of green. Different shades of green can be achieved by mixing different types of green food coloring.
- Crushed peppermint candies or candy canes (for topping): These add a delightful crunch and extra peppermint flavor to the bark. You can crush them in a food processor or simply place them in a resealable bag and crush them with a rolling pin. Other festive toppings can be used, like green sprinkles, edible gold glitter, or even miniature shamrocks.

Preparation:
Step 1: Prepare the Baking Sheet: Line a baking sheet with parchment paper. This is crucial for preventing the chocolate from sticking and makes it easy to remove the bark once it has set. Ensure the parchment paper covers the entire surface of the baking sheet to prevent any chocolate from dripping onto the sheet itself. Alternatively, you can use a silicone baking mat, which is reusable and also prevents sticking.
Step 2: Melt the Dark Chocolate: In a microwave-safe bowl, melt the dark chocolate in 30-second intervals, stirring well after each interval, until it is smooth and completely melted. This method prevents the chocolate from burning. If you prefer, you can melt the chocolate in a double boiler over simmering water, ensuring the bowl doesn’t touch the water. The key is to melt the chocolate slowly and evenly to avoid any lumps or scorching.
Step 3: Spread the Dark Chocolate: Pour the melted dark chocolate onto the prepared baking sheet and spread it into an even layer using a spatula. Aim for a layer that is about ¼ inch thick. This provides a good balance between the dark and white chocolate layers. Make sure the chocolate is evenly distributed to create a uniform base for the bark.
Step 4: Melt the White Chocolate: In another microwave-safe bowl, melt the white chocolate in the same manner as the dark chocolate: 30-second intervals, stirring well after each interval, until smooth. Be extra careful with white chocolate, as it tends to scorch more easily than dark chocolate. Keep a close eye on it and stir frequently. Once melted, stir in the peppermint extract and green food coloring until you achieve your desired shade of green. Adjust the amount of food coloring to get the perfect festive green hue.
Step 5: Swirl and Top: Pour the green white chocolate over the dark chocolate layer. Use a toothpick or skewer to gently swirl the two chocolates together, creating a marbled effect. Be careful not to over-mix, as this can muddy the colors. The goal is to create beautiful swirls and patterns while keeping the colors distinct. Sprinkle the crushed peppermint candies or candy canes evenly over the top of the chocolate. Gently press them into the chocolate to ensure they adhere well.
Step 6: Chill and Break: Refrigerate the baking sheet until the chocolate is completely set, about 1-2 hours. Once set, remove the bark from the refrigerator and break it into irregular pieces. Use a sharp knife to score the chocolate before breaking it for more even pieces. Store the bark in an airtight container in the refrigerator to prevent it from melting.
COOKING Rating:
- Ease of Recipe: Very Easy
- Time Commitment: Minimal
- Likelihood to Make Again: High
- Flavor: Delicious and Refreshing
- Overall Rating: 5/5 stars
Serving Suggestions:
- Serve the St. Patrick’s Day Mint Chocolate Bark as a festive dessert at a St. Patrick’s Day party.
- Package it in small cellophane bags and tie with green ribbon for a thoughtful homemade gift.
- Add it to a dessert platter alongside other Irish-themed treats like shamrock cookies or green cupcakes.
- Enjoy it as a sweet snack with a cup of hot cocoa or coffee.
- Crush it into smaller pieces and use it as a topping for ice cream or yogurt.
Tips:
- Use high-quality chocolate for the best flavor and texture.
- Melt the chocolate slowly and evenly to avoid burning or seizing.
- Be careful not to over-mix the chocolates when creating the marbled effect.
- If you don’t have peppermint extract, you can use peppermint oil, but use it sparingly as it’s more potent.
- For a more intense peppermint flavor, add a few drops of peppermint oil to the melted chocolate.
- Experiment with different toppings, such as sprinkles, edible glitter, or other types of candy.
- Store the bark in an airtight container in the refrigerator to keep it from melting.
- If the chocolate is too thick to swirl easily, you can gently warm it in the microwave for a few seconds.
- For a vegan version, use dairy-free dark and white chocolate alternatives.
- Make sure the crushed peppermint candies are finely crushed for better distribution.
Prep Time: 15 minutes
Cook Time: 5 minutes
Total Time: 2 hours (includes chilling time)
Nutritional Information (per serving):
- Calories: Approximately 200-250
- Protein: 2-3 grams
- Sodium: 10-20 mg
Note: Nutritional information is an estimate and may vary based on specific ingredients used.
Conclusion
This St. Patrick’s Day Mint Chocolate Bark is a simple, festive, and delicious treat that’s perfect for celebrating the holiday. With its beautiful marbled effect, refreshing peppermint flavor, and crunchy topping, it’s sure to be a crowd-pleaser. Whether you’re making it for a party, gifting it to friends, or simply enjoying it as a sweet snack, this bark is a fun and easy way to embrace the spirit of St. Patrick’s Day. The recipe’s versatility also means you can customize it to your liking with different toppings and variations. So, grab your ingredients, put on some Irish music, and get ready to create a festive treat that everyone will love!
Questions and Answers:
Q1: Can I use milk chocolate instead of dark chocolate?
A: Yes, you can certainly use milk chocolate instead of dark chocolate. However, keep in mind that milk chocolate is sweeter than dark chocolate, so the final bark will have a sweeter flavor profile. You might want to reduce the amount of white chocolate slightly to balance the sweetness. Additionally, the dark chocolate provides a nice contrast to the sweetness of the white chocolate and peppermint, so using milk chocolate will result in a less complex flavor.
Q2: What if I don’t have peppermint extract? Can I use something else?
A: If you don’t have peppermint extract, you can try substituting it with peppermint oil. However, peppermint oil is much more potent, so you’ll need to use it sparingly. Start with just a drop or two and taste as you go to avoid overpowering the chocolate. Another alternative is to use peppermint-flavored candy canes. Crush them finely and mix them into the melted white chocolate for a subtle peppermint flavor. You can also infuse the white chocolate with fresh mint leaves by gently heating the chocolate with the leaves, then straining them out before it sets.
Q3: How do I prevent the white chocolate from seizing or burning when melting it?
A: White chocolate is notoriously finicky when it comes to melting. To prevent seizing or burning, use a low and slow approach. Microwave it in short 30-second intervals, stirring well in between each interval. The residual heat will continue to melt the chocolate even after you take it out of the microwave. If using a double boiler, make sure the water in the bottom pot is simmering, not boiling, and that the bowl with the chocolate doesn’t touch the water. Stir the chocolate frequently and remove it from the heat as soon as it’s melted. Adding a small amount of vegetable oil or shortening can also help to prevent seizing.
Q4: Can I add other toppings besides crushed peppermint candies?
A: Absolutely! This recipe is very versatile, and you can add any toppings you like. Some great options include green sprinkles, edible gold glitter, mini chocolate chips, crushed pretzels (for a salty-sweet combination), chopped nuts, or even small candies like M&Ms. Just be sure to add the toppings while the chocolate is still wet so they adhere properly. Get creative and experiment with different combinations to create your own unique bark!
Q5: How long does the bark last, and how should I store it?
A: The St. Patrick’s Day Mint Chocolate Bark will last for about 1-2 weeks if stored properly. To ensure it stays fresh and doesn’t melt, store it in an airtight container in the refrigerator. If you live in a warm climate, it’s best to keep it refrigerated at all times. Avoid leaving the bark at room temperature for extended periods, especially in direct sunlight, as it will quickly become soft and melty. Storing it in the freezer is also an option for longer storage, but be aware that the texture might change slightly when thawed.
St. Patrick’s Day Mint Chocolate Bark
Ingredients
- 12 oz dark chocolate chopped: Use a good quality dark chocolate with a cocoa content of at least 60% for a rich, intense flavor that balances the sweetness of the white chocolate. Chopping the chocolate ensures it melts evenly and smoothly. You can also use dark chocolate chips if preferred, but chopped chocolate melts more evenly.
- 12 oz white chocolate chopped: Opt for a high-quality white chocolate to avoid a waxy texture. Just like the dark chocolate, chopping the white chocolate will help it melt evenly. White chocolate chips can be substituted, but using a bar of white chocolate and chopping it will give a smoother and better result.
- 1 tsp peppermint extract: Peppermint extract is what gives the white chocolate its refreshing minty flavor. Be careful not to add too much, as it can easily overpower the chocolate. Start with a teaspoon and add more to taste if desired. High-quality extract will provide the best flavor.
- Green food coloring: Gel food coloring is recommended over liquid food coloring because it’s more concentrated and won’t affect the consistency of the chocolate. Start with a few drops and gradually add more until you achieve your desired shade of green. Different shades of green can be achieved by mixing different types of green food coloring.
- Crushed peppermint candies or candy canes for topping: These add a delightful crunch and extra peppermint flavor to the bark. You can crush them in a food processor or simply place them in a resealable bag and crush them with a rolling pin. Other festive toppings can be used, like green sprinkles, edible gold glitter, or even miniature shamrocks.
Instructions
- Step 1: Prepare the Baking Sheet: Line a baking sheet with parchment paper. This is crucial for preventing the chocolate from sticking and makes it easy to remove the bark once it has set. Ensure the parchment paper covers the entire surface of the baking sheet to prevent any chocolate from dripping onto the sheet itself. Alternatively, you can use a silicone baking mat, which is reusable and also prevents sticking.
- Step 2: Melt the Dark Chocolate: In a microwave-safe bowl, melt the dark chocolate in 30-second intervals, stirring well after each interval, until it is smooth and completely melted. This method prevents the chocolate from burning. If you prefer, you can melt the chocolate in a double boiler over simmering water, ensuring the bowl doesn’t touch the water. The key is to melt the chocolate slowly and evenly to avoid any lumps or scorching.
- Step 3: Spread the Dark Chocolate: Pour the melted dark chocolate onto the prepared baking sheet and spread it into an even layer using a spatula. Aim for a layer that is about ¼ inch thick. This provides a good balance between the dark and white chocolate layers. Make sure the chocolate is evenly distributed to create a uniform base for the bark.
- Step 4: Melt the White Chocolate: In another microwave-safe bowl, melt the white chocolate in the same manner as the dark chocolate: 30-second intervals, stirring well after each interval, until smooth. Be extra careful with white chocolate, as it tends to scorch more easily than dark chocolate. Keep a close eye on it and stir frequently. Once melted, stir in the peppermint extract and green food coloring until you achieve your desired shade of green. Adjust the amount of food coloring to get the perfect festive green hue.
- Step 5: Swirl and Top: Pour the green white chocolate over the dark chocolate layer. Use a toothpick or skewer to gently swirl the two chocolates together, creating a marbled effect. Be careful not to over-mix, as this can muddy the colors. The goal is to create beautiful swirls and patterns while keeping the colors distinct. Sprinkle the crushed peppermint candies or candy canes evenly over the top of the chocolate. Gently press them into the chocolate to ensure they adhere well.
- Step 6: Chill and Break: Refrigerate the baking sheet until the chocolate is completely set, about 1-2 hours. Once set, remove the bark from the refrigerator and break it into irregular pieces. Use a sharp knife to score the chocolate before breaking it for more even pieces. Store the bark in an airtight container in the refrigerator to prevent it from melting.