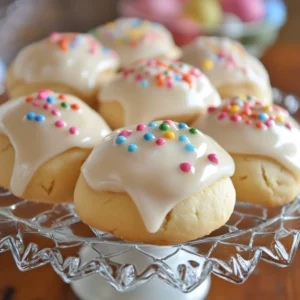
Italian Easter Cookies / Uncinetti
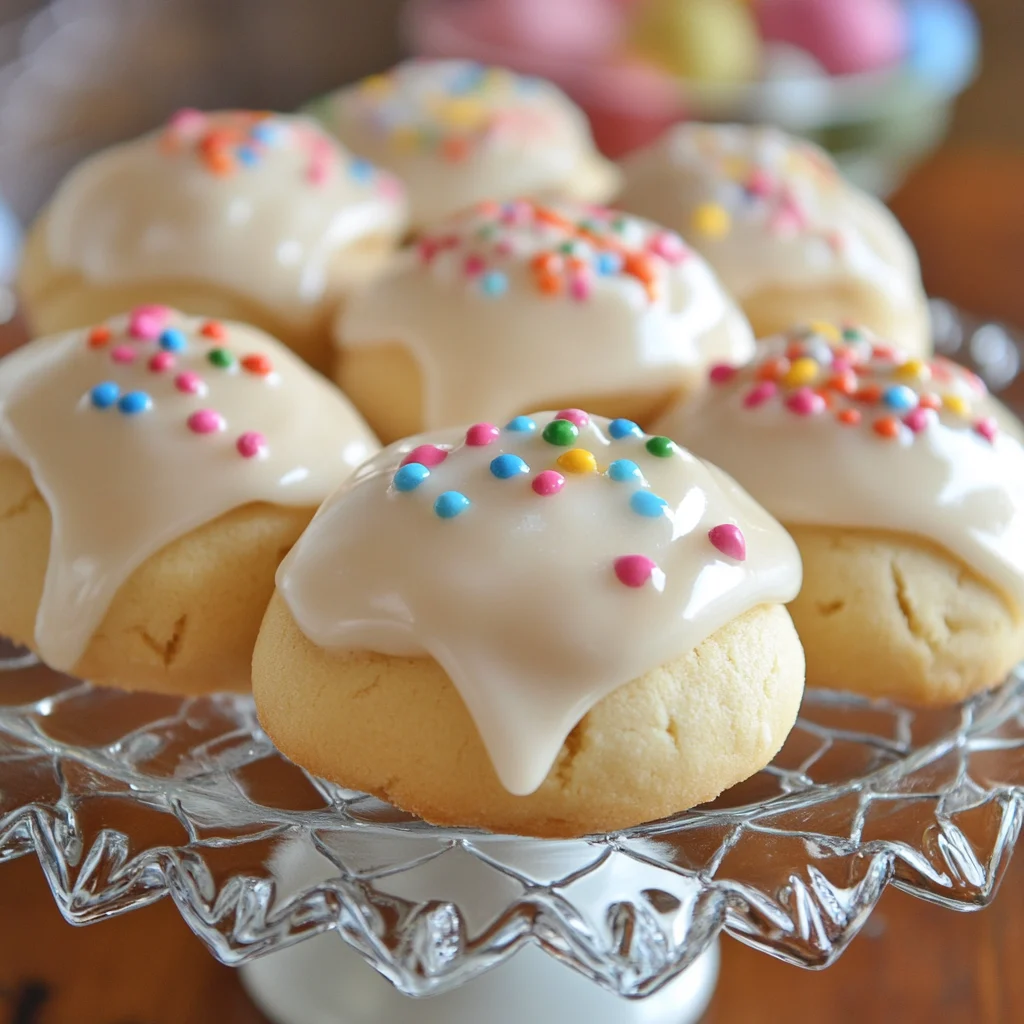
Description of this recipe: These Italian Easter Cookies, known as Uncinetti (meaning “little hooks” in Italian), are a delightful, lightly sweet treat perfect for sharing during the Easter holiday. They feature a simple, subtly flavored dough that’s shaped into charming knots or rings and then baked to a delicate golden brown. A luscious lemon glaze adds a bright, citrusy finish that complements the cookie’s mild sweetness.
Why you will love this recipe:
- Easy to make: The dough comes together quickly and easily with just a few simple ingredients, making it a great recipe for beginner bakers.
- Charming and festive: The knotted or ringed shape adds a touch of elegance and festivity, perfect for Easter celebrations.
- Versatile: The dough is a blank canvas for flavor additions. Experiment with different citrus zests or a hint of anise.
- Perfect for sharing: These cookies are ideal for gifting to friends and family or bringing to Easter gatherings.
- Satisfyingly Sweet: Not overly sweet, these little morsels will provide your day with sweetness while holding on to a traditional flavor
- Freezable: These cookies can be frozen and are freezer friendly
- Lemon glaze: The traditional lemon glaze will have you craving these cookies
Introduction
Italian Easter Cookies, or Uncinetti, are a beloved tradition passed down through generations. These charming cookies, often shaped into knots or rings, symbolize the interwoven aspects of life and the promise of new beginnings that Easter represents. Unlike some Easter desserts that are rich and decadent, Uncinetti are lightly sweet, allowing the delicate flavors of lemon zest and vanilla to shine through. This recipe captures the essence of this classic treat, providing a simple and approachable method for creating these delightful cookies at home. Whether you’re looking to continue a family tradition or simply want to add a touch of Italian flair to your Easter celebration, these cookies are sure to be a hit.
Ingredients:
ITALIAN EASTER COOKIES:
- 1 ½ cups + 2 tablespoons all-purpose flour (200 grams total)
- 3 ¼ tablespoons granulated sugar
- 1 teaspoon baking powder
- 1 pinch salt
- Zest of 1 lemon
- 1 large egg
- ¼ cup butter, melted and cooled
- 4 tablespoons milk (2% or whole milk recommended)
If you use unsalted butter then add 1/4 teaspoon of salt.
LEMON GLAZE:
- 1 ½ – 2 cups powdered sugar, sifted
- 1 tablespoon lemon juice (approximately)
- 1 tablespoon milk (approximately)

Preparation:
Step 1: Prepare the Oven and Baking Sheet
Preheat your oven to 300°F (150°C). This lower temperature ensures the cookies bake evenly and don’t brown too quickly. Line a large baking sheet with parchment paper. Parchment paper prevents the cookies from sticking and makes cleanup a breeze. You can also lightly grease and flour the baking sheet as an alternative.
Step 2: Combine Dry Ingredients
In a large bowl, whisk together the all-purpose flour, granulated sugar, baking powder, salt, and lemon zest. Whisking ensures the ingredients are evenly distributed, resulting in a consistent texture. The lemon zest adds a bright, aromatic note to the cookies.
Step 3: Incorporate Wet Ingredients
Create a well in the center of the dry ingredients. Add the egg, melted and cooled butter, and milk to the well. Using a fork, gradually combine the wet ingredients with the dry ingredients, starting from the center and working outwards. Mix until the dough is almost combined. Avoid overmixing at this stage.
Step 4: Knead the Dough
Transfer the mixture to a lightly floured flat surface. Gently knead the dough for a few minutes, until it forms a smooth and cohesive ball. Be careful not to overknead, as this can develop the gluten in the flour and make the cookies tough. The dough should be soft and pliable.
Step 5: Shape the Cookies
Divide the dough into small portions. Roll each portion into a 5-6 inch (13-16 cm) rope. The ropes should be relatively thin for a delicate cookie. Form the ropes into knots or rings. To make knots, simply tie the rope into a simple knot. To make rings, join the ends of the rope together, pressing them firmly to seal. You can also create other shapes as desired.
Step 6: Bake the Cookies
Place the shaped cookies onto the prepared baking sheet, leaving a little space between each cookie. Bake in the preheated oven for approximately 15-18 minutes, or until the cookies are lightly golden brown. The baking time may vary depending on your oven, so keep a close eye on them.
Step 7: Cool and Glaze
Remove the cookies from the oven and let them cool completely on the baking sheet before glazing. Cooling allows the cookies to firm up and prevents the glaze from melting. While the cookies are cooling, prepare the lemon glaze. In a small bowl, whisk together the sifted powdered sugar, lemon juice, and milk until you reach your desired consistency. The glaze should be smooth and pourable.
Step 8: Glaze and Enjoy
Once the cookies are completely cooled, dip each cookie into the lemon glaze, allowing the excess to drip off. Place the glazed cookies on a wire rack to allow the glaze to set completely. You can also sprinkle the glazed cookies with sprinkles or additional lemon zest for added decoration.
COOKING Rating:
Easy
Serving Suggestions:
- Serve these cookies as part of your Easter dessert spread.
- Enjoy them with a cup of coffee or tea.
- Package them in a decorative box or bag for gifting.
- Serve with a cup of Italian espresso
Tips:
- For a richer flavor, use salted butter in the dough.
- If you don’t have lemon zest, you can use a few drops of lemon extract.
- Adjust the amount of milk in the glaze to achieve your desired consistency.
- For a crispier cookie, bake them for a slightly longer time.
- To prevent the cookies from spreading too much, chill the dough for 30 minutes before shaping.
- For a slightly different flavor profile, consider adding a touch of anise extract or a sprinkle of anise seeds to the dough.
- Some readers mention the use of olive oil instead of butter, I recommend using a light olive oil in the dough
Prep Time:
10 minutes
Cook Time:
15 minutes
Total Time:
25 minutes
Nutritional Information:
(Per cookie, approximate)
- Calories: 76 kcal
- Protein: 2g
- Sodium: 38mg
Conclusion
Italian Easter Cookies are a timeless treat that brings joy to any Easter celebration. With their simple ingredients, easy preparation, and delightful lemon glaze, these cookies are sure to become a family favorite. Whether you’re baking them for yourself or sharing them with loved ones, these Uncinetti are a sweet reminder of the traditions and celebrations that bring us together.
Questions and Answers:
Q1: Can I make the dough ahead of time?
A: Absolutely! The dough can be made ahead of time and stored in the refrigerator for up to 24 hours. Wrap it tightly in plastic wrap to prevent it from drying out. Allow the dough to come to room temperature slightly before rolling and shaping.
Q2: Can I freeze the baked cookies?
A: Yes, you can freeze the baked cookies for up to 3 months. Allow the cookies to cool completely before freezing. Place them in a single layer on a baking sheet and freeze for about 30 minutes, then transfer them to an airtight container or freezer bag. This prevents them from sticking together. Thaw the cookies at room temperature before serving.
Q3: Can I use a different type of glaze?
A: Of course! While the lemon glaze is traditional, you can experiment with other glazes. A simple vanilla glaze, a chocolate glaze, or even a dusting of powdered sugar would all be delicious.
Q4: Can I add sprinkles to the cookies?
A: Yes! Sprinkles are a fun and festive addition to these cookies. Add them after glazing while the glaze is still wet so they adhere properly.
Q5: My cookies are spreading too much in the oven. What can I do?
A: If your cookies are spreading too much, try chilling the dough for 30 minutes before shaping. This will help to firm up the butter and prevent the cookies from spreading excessively. Also, make sure your oven is not too hot. Baking at a lower temperature can also help to prevent spreading.
Italian Easter Cookies / Uncinetti
Ingredients
- ITALIAN EASTER COOKIES:
- 1 ½ cups + 2 tablespoons all-purpose flour 200 grams total
- 3 ¼ tablespoons granulated sugar
- 1 teaspoon baking powder
- 1 pinch salt
- Zest of 1 lemon
- 1 large egg
- ¼ cup butter melted and cooled
- 4 tablespoons milk 2% or whole milk recommended
- If you use unsalted butter then add 1/4 teaspoon of salt.
- LEMON GLAZE:
- 1 ½ – 2 cups powdered sugar sifted
- 1 tablespoon lemon juice approximately
- 1 tablespoon milk approximately
Instructions
- Step 1: Prepare the Oven and Baking Sheet
- Preheat your oven to 300°F (150°C). This lower temperature ensures the cookies bake evenly and don’t brown too quickly. Line a large baking sheet with parchment paper. Parchment paper prevents the cookies from sticking and makes cleanup a breeze. You can also lightly grease and flour the baking sheet as an alternative.
- Step 2: Combine Dry Ingredients
- In a large bowl, whisk together the all-purpose flour, granulated sugar, baking powder, salt, and lemon zest. Whisking ensures the ingredients are evenly distributed, resulting in a consistent texture. The lemon zest adds a bright, aromatic note to the cookies.
- Step 3: Incorporate Wet Ingredients
- Create a well in the center of the dry ingredients. Add the egg, melted and cooled butter, and milk to the well. Using a fork, gradually combine the wet ingredients with the dry ingredients, starting from the center and working outwards. Mix until the dough is almost combined. Avoid overmixing at this stage.
- Step 4: Knead the Dough
- Transfer the mixture to a lightly floured flat surface. Gently knead the dough for a few minutes, until it forms a smooth and cohesive ball. Be careful not to overknead, as this can develop the gluten in the flour and make the cookies tough. The dough should be soft and pliable.
- Step 5: Shape the Cookies
- Divide the dough into small portions. Roll each portion into a 5-6 inch (13-16 cm) rope. The ropes should be relatively thin for a delicate cookie. Form the ropes into knots or rings. To make knots, simply tie the rope into a simple knot. To make rings, join the ends of the rope together, pressing them firmly to seal. You can also create other shapes as desired.
- Step 6: Bake the Cookies
- Place the shaped cookies onto the prepared baking sheet, leaving a little space between each cookie. Bake in the preheated oven for approximately 15-18 minutes, or until the cookies are lightly golden brown. The baking time may vary depending on your oven, so keep a close eye on them.
- Step 7: Cool and Glaze
- Remove the cookies from the oven and let them cool completely on the baking sheet before glazing. Cooling allows the cookies to firm up and prevents the glaze from melting. While the cookies are cooling, prepare the lemon glaze. In a small bowl, whisk together the sifted powdered sugar, lemon juice, and milk until you reach your desired consistency. The glaze should be smooth and pourable.
- Step 8: Glaze and Enjoy
- Once the cookies are completely cooled, dip each cookie into the lemon glaze, allowing the excess to drip off. Place the glazed cookies on a wire rack to allow the glaze to set completely. You can also sprinkle the glazed cookies with sprinkles or additional lemon zest for added decoration.