Chocolate-Dipped Bunny Pretzels
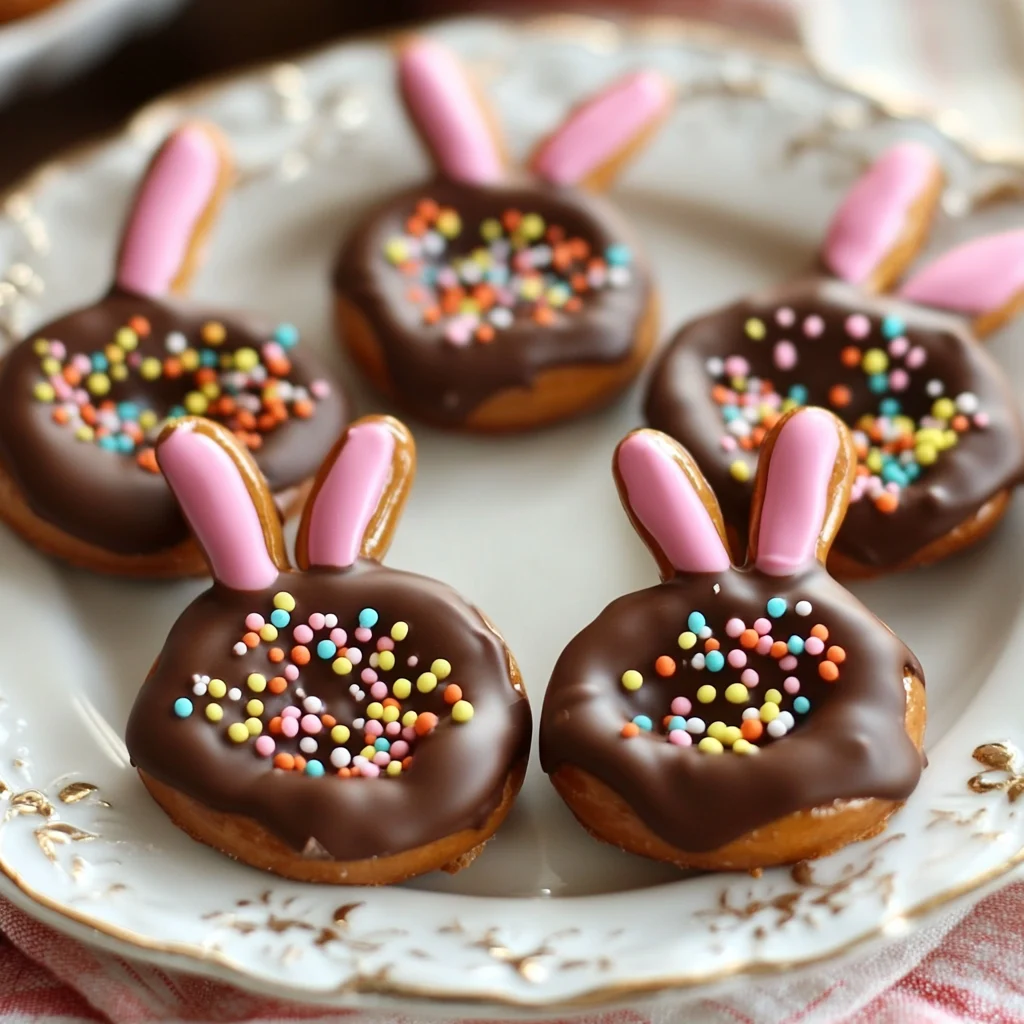
Description of this recipe: These Chocolate-Dipped Bunny Pretzels are a delightful combination of salty pretzels and sweet chocolate, transformed into charming bunny shapes. Decorated with colorful sprinkles and miniature candies, they are a perfect treat for Easter, spring celebrations, or simply a fun baking activity with kids. This recipe is easy to follow and yields a batch of adorable and delicious snacks that are sure to be a hit with everyone.
Why you will love this recipe: You’ll love this recipe because it’s not only incredibly simple and quick to make, but also wonderfully customizable. The combination of sweet and salty flavors is irresistible, and the visual appeal of the bunny shapes makes them extra special. These pretzels are a fantastic way to get creative in the kitchen, and they offer a delightful, homemade touch to any holiday gathering or snack time. Plus, it’s a wonderful activity to involve children in, fostering creativity and culinary skills in a fun and engaging way.
Introduction
Springtime is synonymous with vibrant colors, blooming flowers, and, of course, Easter celebrations. What better way to celebrate the season than with a batch of homemade, adorable, and delicious Chocolate-Dipped Bunny Pretzels? These aren’t just your average pretzels; they are whimsical treats that bring joy to both the maker and the consumer.
This recipe takes the classic combination of salty pretzels and sweet chocolate and elevates it with a touch of creativity. Imagine the delight on children’s faces as they help assemble these charming bunnies, carefully placing the ears, eyes, and nose on each pretzel. The process is as enjoyable as the final product, creating lasting memories and a fun family activity.
These Chocolate-Dipped Bunny Pretzels are incredibly versatile. They are perfect for Easter baskets, spring parties, school events, or simply as a sweet and salty snack to enjoy at any time of the day. The recipe is easy to adapt, allowing you to use your favorite types of chocolate, sprinkles, and candies to create a personalized treat that reflects your individual tastes and preferences.
Whether you’re a seasoned baker or a novice in the kitchen, this recipe is accessible and straightforward. With just a few simple ingredients and easy-to-follow steps, you can create a batch of these charming bunny pretzels that are sure to impress. So, gather your ingredients, put on your apron, and let’s hop into the kitchen to create some springtime magic! These are perfect for gifting too. A little cellophane bag tied with ribbon, and you have an adorable and edible gift for friends and family.
Ingredients:
- 12-15 large pretzel rings (the bigger, the better for making the “body”)
- 12-15 small pretzel twists (for the bunny’s head – choose a size proportionate to the body)
- Approximately 24-30 small pretzel loops (for the ears – Grippos loops are ideal, but any small pretzel loop will work)
- 1 cup (approximately 6 ounces) milk chocolate chips, dark chocolate chips, white chocolate chips, or candy melts (use your favorite flavor or a combination)
- Assorted colorful sprinkles (jimmies, nonpareils, sanding sugar – a variety adds visual appeal)
- Mini candy decorations for eyes and nose (mini M&Ms, candy pearls, chocolate chips, or even edible glitter)
- Optional: Edible food markers or colored icing for drawing whiskers or adding other details
- Optional: Shortening or coconut oil (1 teaspoon) – This can help thin the chocolate for easier dipping and a smoother finish.

Preparation:
Step 1: Prepare Your Workspace and Ingredients
Before you begin, clear a workspace and line a baking sheet with wax paper or parchment paper. This will prevent the chocolate from sticking and make cleanup a breeze. Gather all your ingredients and arrange them in a way that is easily accessible. Melt the chocolate in a microwave-safe bowl or using a double boiler.
If using a microwave, heat the chocolate in 30-second intervals, stirring well between each interval to prevent burning. Stop heating when there are still a few unmelted pieces, and continue stirring until the chocolate is completely smooth. This method helps avoid overheating the chocolate and ensures a glossy finish. If using a double boiler, bring water to a simmer in the bottom pot. Place the chocolate in the top pot and stir gently until melted and smooth.
If the chocolate seems too thick for dipping, add a teaspoon of shortening or coconut oil. This will thin the chocolate and make it easier to coat the pretzels evenly. Stir until the shortening or coconut oil is fully incorporated.
Step 2: Assemble the Bunny Body
Take one large pretzel ring and dip it completely into the melted chocolate, ensuring that the entire surface is coated. Lift the pretzel out of the chocolate and gently tap off any excess. Place the chocolate-covered pretzel on the prepared baking sheet. Repeat this process for all the large pretzel rings.
Step 3: Attach the Bunny Head
Next, take a small pretzel twist and dip it fully into the melted chocolate. Again, tap off any excess chocolate. Carefully attach the chocolate-covered small pretzel twist to the top of the large pretzel ring to form the bunny’s head. Press gently to ensure a good connection. The melted chocolate will act as “glue,” holding the head in place.
Step 4: Add the Bunny Ears
Now comes the fun part: adding the ears! Take two small pretzel loops and attach them to the top of the small pretzel twist, forming the bunny’s ears. Dip the end of each pretzel loop in the melted chocolate before attaching them to ensure they stay in place. Position the ears so they are angled slightly upwards to give the bunny a cute and perky appearance. If you don’t have pretzel loops, you can use small pretzel sticks, breaking them in half to create shorter ears.
Step 5: Decorate the Bunny
While the chocolate is still wet, sprinkle the entire bunny (body, head, and ears) with colorful sprinkles. The sprinkles will adhere to the wet chocolate and add a festive touch. Use a variety of sprinkles to create a visually appealing and whimsical design.
Next, place mini candy decorations for the eyes and nose on the head area. Use mini M&Ms, candy pearls, or even small pieces of chocolate chips for the eyes. Choose a different color candy for the nose, such as a pink mini M&M or a red candy pearl.
For an extra touch of detail, use edible food markers or colored icing to draw whiskers on the bunny’s face. You can also add other details, such as a small mouth or rosy cheeks. Let your creativity shine and give each bunny a unique expression.
Step 6: Set and Serve
Allow the pretzels to sit undisturbed on the baking sheet until the chocolate hardens completely. This usually takes about 30-60 minutes at room temperature, or you can speed up the process by placing the baking sheet in the refrigerator for 15-20 minutes.
Once the chocolate has hardened, your adorable Chocolate-Dipped Bunny Pretzels are ready to serve! Arrange them on a platter, place them in Easter baskets, or package them in cellophane bags for gifting.
COOKING Rating:
- Ease: Easy
- Time: Quick
- Taste: Sweet and Salty
- Presentation: Adorable
- Kid-Friendly: Yes
Serving Suggestions:
- Serve these bunny pretzels as a delightful addition to Easter baskets.
- Arrange them on a platter for a festive springtime party treat.
- Pack them in lunchboxes for a fun and unexpected snack.
- Enjoy them with a cup of coffee or tea for a sweet and salty afternoon treat.
- Use them as edible decorations for cupcakes or cakes.
Tips:
- To prevent the chocolate from seizing, avoid getting water or steam into the melted chocolate.
- If using candy melts, follow the instructions on the package for melting.
- For a smoother chocolate finish, add a small amount of shortening or coconut oil to the melted chocolate.
- Use different types of chocolate (milk, dark, white) to create a variety of bunny pretzels.
- Get creative with the decorations – use different colors of sprinkles, candies, and edible markers to personalize each bunny.
- If you don’t have pretzel loops for the ears, you can use small pretzel sticks, broken in half.
- Store the finished bunny pretzels in an airtight container at room temperature for up to a week.
Prep Time:
- 15 minutes
Cook Time:
- 5 minutes (for melting chocolate)
Total Time:
- 20 minutes + setting time
Nutritional Information (estimated, per pretzel):
- Calories: Approximately 150-200 calories (depending on the type of chocolate and decorations used)
- Protein: 2-3 grams
- Sodium: 150-200 mg
Note: This is an estimate. Nutritional content can vary greatly depending on the specific brands and amounts of ingredients used.
Conclusion
These Chocolate-Dipped Bunny Pretzels are more than just a snack; they are a delightful experience that brings joy and creativity into the kitchen. With their charming bunny shapes and irresistible combination of sweet and salty flavors, they are a perfect treat for Easter, spring celebrations, or any time you want to add a touch of whimsy to your day. So, gather your ingredients, grab your apron, and get ready to hop into the kitchen and create some springtime magic!
Five Questions and Answers About This Recipe:
Q1: Can I use different types of chocolate for this recipe?
A: Absolutely! Feel free to experiment with different types of chocolate to suit your taste preferences. Milk chocolate, dark chocolate, white chocolate, or even a combination of all three would work wonderfully. You can also use flavored candy melts for a fun and colorful twist. Just ensure that the chocolate you choose melts smoothly and evenly.
Q2: What if I don’t have pretzel loops for the bunny ears?
A: No problem at all! If you don’t have pretzel loops, you can easily substitute them with small pretzel sticks. Simply break the pretzel sticks in half to create smaller ears and attach them to the bunny’s head using the melted chocolate. Alternatively, you could use small candy melts or even piped icing to create the ears.
Q3: How can I prevent the chocolate from seizing while melting it?
A: Preventing the chocolate from seizing is crucial for a smooth and glossy finish. The key is to avoid getting any water or steam into the melted chocolate. Use a clean, dry bowl and utensils. When melting chocolate in the microwave, heat it in short intervals (30 seconds) and stir well between each interval to prevent overheating. If using a double boiler, ensure that the bottom pot is simmering and not boiling, and that the top pot is not touching the water. If the chocolate does seize, try adding a small amount of shortening or coconut oil, stirring until the chocolate becomes smooth again.
Q4: Can I make these bunny pretzels ahead of time?
A: Yes, you can definitely make these bunny pretzels ahead of time. Once the chocolate has hardened completely, store them in an airtight container at room temperature for up to a week. If you live in a warm climate, you may want to store them in the refrigerator to prevent the chocolate from melting. When storing, be sure to layer the pretzels between sheets of parchment paper to prevent them from sticking together.
Q5: What are some other creative ways to decorate these bunny pretzels?
A: There are endless possibilities when it comes to decorating these bunny pretzels! You can use different colors of sprinkles, candies, and edible markers to create unique and personalized designs. Try using edible glitter for a sparkly effect, or add small pieces of dried fruit or nuts for a textural element. You can also use piped icing to create more intricate details, such as whiskers, rosy cheeks, or even a tiny bow tie for the bunny. Let your imagination run wild and have fun with the decorating process! You can use a piping bag to add detail to their “clothes”!

Chocolate-Dipped Bunny Pretzels
Ingredients
- 12-15 large pretzel rings the bigger, the better for making the “body”
- 12-15 small pretzel twists for the bunny’s head – choose a size proportionate to the body
- Approximately 24-30 small pretzel loops for the ears – Grippos loops are ideal, but any small pretzel loop will work
- 1 cup approximately 6 ounces milk chocolate chips, dark chocolate chips, white chocolate chips, or candy melts (use your favorite flavor or a combination)
- Assorted colorful sprinkles jimmies, nonpareils, sanding sugar – a variety adds visual appeal
- Mini candy decorations for eyes and nose mini M&Ms, candy pearls, chocolate chips, or even edible glitter
- Optional: Edible food markers or colored icing for drawing whiskers or adding other details
- Optional: Shortening or coconut oil 1 teaspoon – This can help thin the chocolate for easier dipping and a smoother finish.
Instructions
- Step 1: Prepare Your Workspace and Ingredients
- Before you begin, clear a workspace and line a baking sheet with wax paper or parchment paper. This will prevent the chocolate from sticking and make cleanup a breeze. Gather all your ingredients and arrange them in a way that is easily accessible. Melt the chocolate in a microwave-safe bowl or using a double boiler.
- If using a microwave, heat the chocolate in 30-second intervals, stirring well between each interval to prevent burning. Stop heating when there are still a few unmelted pieces, and continue stirring until the chocolate is completely smooth. This method helps avoid overheating the chocolate and ensures a glossy finish. If using a double boiler, bring water to a simmer in the bottom pot. Place the chocolate in the top pot and stir gently until melted and smooth.
- If the chocolate seems too thick for dipping, add a teaspoon of shortening or coconut oil. This will thin the chocolate and make it easier to coat the pretzels evenly. Stir until the shortening or coconut oil is fully incorporated.
- Step 2: Assemble the Bunny Body
- Take one large pretzel ring and dip it completely into the melted chocolate, ensuring that the entire surface is coated. Lift the pretzel out of the chocolate and gently tap off any excess. Place the chocolate-covered pretzel on the prepared baking sheet. Repeat this process for all the large pretzel rings.
- Step 3: Attach the Bunny Head
- Next, take a small pretzel twist and dip it fully into the melted chocolate. Again, tap off any excess chocolate. Carefully attach the chocolate-covered small pretzel twist to the top of the large pretzel ring to form the bunny’s head. Press gently to ensure a good connection. The melted chocolate will act as “glue,” holding the head in place.
- Step 4: Add the Bunny Ears
- Now comes the fun part: adding the ears! Take two small pretzel loops and attach them to the top of the small pretzel twist, forming the bunny’s ears. Dip the end of each pretzel loop in the melted chocolate before attaching them to ensure they stay in place. Position the ears so they are angled slightly upwards to give the bunny a cute and perky appearance. If you don’t have pretzel loops, you can use small pretzel sticks, breaking them in half to create shorter ears.
- Step 5: Decorate the Bunny
- While the chocolate is still wet, sprinkle the entire bunny (body, head, and ears) with colorful sprinkles. The sprinkles will adhere to the wet chocolate and add a festive touch. Use a variety of sprinkles to create a visually appealing and whimsical design.
- Next, place mini candy decorations for the eyes and nose on the head area. Use mini M&Ms, candy pearls, or even small pieces of chocolate chips for the eyes. Choose a different color candy for the nose, such as a pink mini M&M or a red candy pearl.
- For an extra touch of detail, use edible food markers or colored icing to draw whiskers on the bunny’s face. You can also add other details, such as a small mouth or rosy cheeks. Let your creativity shine and give each bunny a unique expression.
- Step 6: Set and Serve
- Allow the pretzels to sit undisturbed on the baking sheet until the chocolate hardens completely. This usually takes about 30-60 minutes at room temperature, or you can speed up the process by placing the baking sheet in the refrigerator for 15-20 minutes.
- Once the chocolate has hardened, your adorable Chocolate-Dipped Bunny Pretzels are ready to serve! Arrange them on a platter, place them in Easter baskets, or package them in cellophane bags for gifting.