No-Bake Chocolate Dream Cake
Description of this recipe:
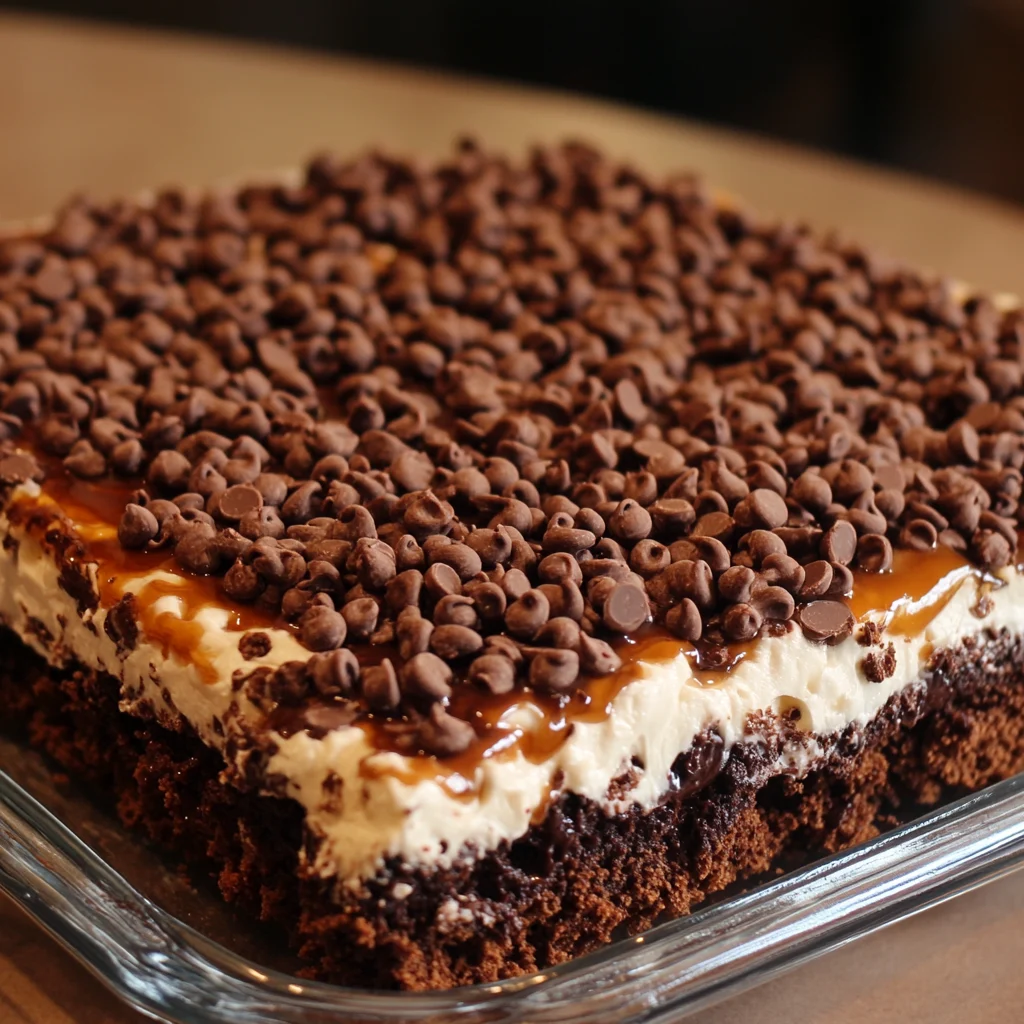
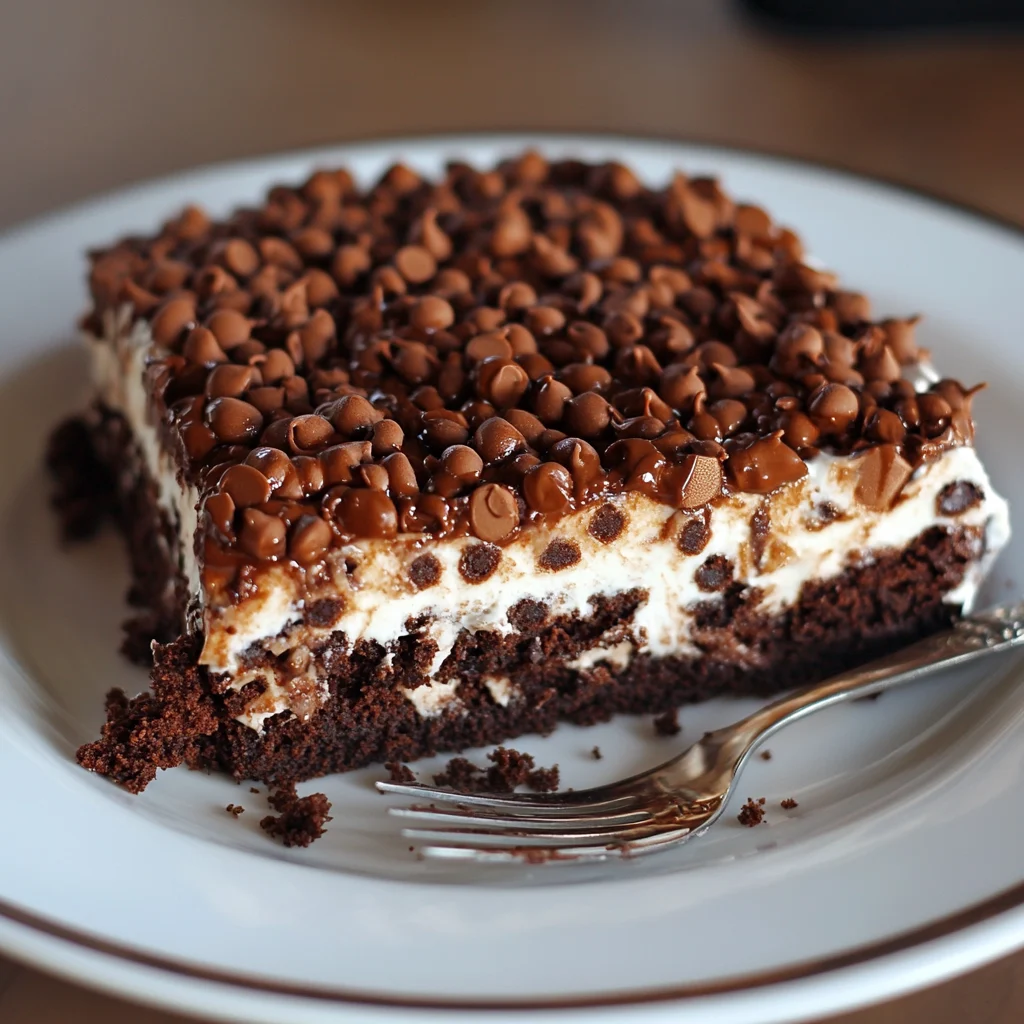
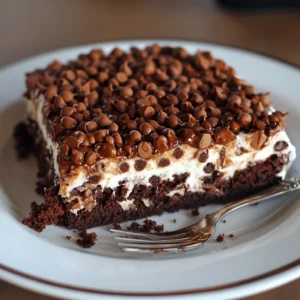
This recipe, inspired by the popular “Ahmed Al-Zamel Cake,” is a decadent and utterly irresistible no-bake dessert perfect for satisfying any chocolate craving. It features layers of moist chocolate cake soaked in chocolate milk, a rich and tangy cream cheese filling, a luscious dark chocolate ganache, and a crunchy, chocolate-coated Rice Krispies topping. This is a crowd-pleasing dessert that’s surprisingly easy to assemble and guarantees to be a hit at any gathering.
Why you will love this recipe:
This Ahmed Al-Zamel Inspired cake is a winner for so many reasons! First, it requires absolutely no baking, making it a fantastic option for hot days or when you’re short on time. The contrasting textures – the soft, chocolatey cake, the creamy filling, the smooth ganache, and the crispy topping – create a delightful sensory experience. The combination of flavors is simply divine: the deep, intense chocolate plays beautifully with the tangy cream cheese and the subtle sweetness of the condensed milk. Plus, it’s easily customizable! You can adjust the sweetness to your liking, use different types of chocolate, or experiment with other toppings. It’s a guaranteed crowd-pleaser that looks impressive but is surprisingly simple to make. This cake is more than just a dessert; it’s an experience. The layers meld together in perfect harmony, delivering a symphony of flavors and textures that will leave you wanting more. The best part? You don’t need to be a pastry chef to achieve impressive results. This recipe is forgiving and adaptable, making it perfect for both seasoned bakers and kitchen novices alike. Prepare to be showered with compliments!
Introduction
In the world of desserts, simplicity and indulgence often go hand-in-hand. And nothing proves that better than this Ahmed Al-Zamel inspired no-bake cake. This recipe captures the essence of a decadent, multi-layered treat without the fuss of baking. Think moist, chocolatey goodness, a creamy, tangy filling, a rich, dark chocolate ganache, and a delightful, crunchy topping, all coming together in perfect harmony. This is more than just a dessert; it’s an experience, a journey of flavors and textures that will tantalize your taste buds and leave you craving more. The beauty of this recipe lies in its adaptability. While the core elements remain consistent, you can easily customize it to suit your preferences. Prefer milk chocolate over dark? Go for it! Want to add a hint of coffee to the cream cheese filling? Be our guest! The possibilities are endless. This cake is perfect for any occasion, from casual family gatherings to more formal dinner parties. Its impressive presentation belies its simplicity, making it a surefire way to impress your guests without spending hours in the kitchen. Whether you’re a seasoned baker or a complete novice, this recipe is accessible and forgiving, ensuring that you’ll achieve delicious results every time. So, gather your ingredients, put on some music, and get ready to create a dessert masterpiece that will have everyone asking for seconds (and the recipe!). This is the perfect way to celebrate a special occasion or simply indulge in a sweet treat.
Ingredients:
First Layer: Cake Base
- Ready-Made Chocolate Cake (about 500g)
- 1 cup Chocolate-flavored milk, cocoa powder-infused milk, or chocolate sauce (adjust to desired moistness)
Second Layer: Cream Cheese
- 280 grams (10 oz) Cream Cheese, softened to room temperature
- 1 cup (240ml) Heavy Cream (Liquid Cream), cold
- ½ can (about 200g) Sweetened Condensed Milk
- 1 packet (about 30g) Instant Cream Powder (optional, for extra thickness)
Third Layer: Chocolate Sauce (Ganache)
- 1 ¼ cups (200g) Chocolate Chips (dark, semi-sweet, or milk chocolate)
- 1 cup (240ml) Heavy Cream, heated until almost simmering
Final Layer: Decoration
- 2 cups Rice Krispies Chocolate Cereal (or plain Rice Krispies mixed with melted chocolate)
- 200g Melted Chocolate (for coating the Rice Krispies, if using plain cereal)
- 2 tablespoons Cocoa Powder (for dusting)
Preparation:
Step 1: Prepare the Cake Base
Cut the ready-made chocolate cake into approximately 1-inch cubes. Place the cake cubes in the bottom of a serving bowl or dish (a trifle bowl works beautifully, but any large bowl will do). Ensure the cake is evenly distributed to create a consistent base layer.
Step 2: Soak the Cake Layer
Slowly and evenly pour the chocolate-flavored milk (or cocoa powder-infused milk/chocolate sauce) over the cake cubes. Add the liquid gradually, allowing the cake to absorb it fully. The goal is to moisten the cake without making it soggy. You may not need to use all of the milk; use just enough to ensure the cake is thoroughly moistened. This step is crucial for adding flavor and creating a soft, melt-in-your-mouth texture.
Step 3: Prepare the Cream Cheese Filling
In a large bowl, combine the softened cream cheese and cold heavy cream. Using an electric mixer (either a stand mixer or a hand mixer), beat the mixture on medium speed until it is smooth and creamy. Be careful not to over-mix, as this can cause the cream cheese to become too thin. Gradually add the sweetened condensed milk and continue mixing until well combined. If desired, add the instant cream powder (this will help to stabilize the filling and make it thicker). Mix until the filling is smooth, thick, and holds its shape. Taste and adjust the sweetness if needed.
Step 4: Layer the Cream Cheese Filling
Carefully spoon the cream cheese filling over the soaked cake layer. Spread the filling evenly to create a smooth, consistent layer. Use an offset spatula or the back of a spoon to ensure the filling reaches all the edges of the bowl.
Step 5: Prepare the Chocolate Ganache
Place the chocolate chips in a heat-safe bowl. In a separate saucepan, heat the heavy cream over medium heat until it is just about to simmer. Remove the cream from the heat and pour it over the chocolate chips. Let the mixture sit for about a minute to allow the chocolate to melt. Gently stir the mixture until the chocolate is completely melted and the ganache is smooth and glossy. If there are any remaining lumps, microwave the mixture in 15-second intervals, stirring after each interval, until completely smooth.
Step 6: Layer the Chocolate Ganache
Pour the warm chocolate ganache over the cream cheese layer. Gently spread the ganache evenly to create a smooth, rich chocolate topping. Tilt the bowl to help the ganache spread to all the edges.
Step 7: Prepare the Chocolate Rice Krispies Topping
If using plain Rice Krispies cereal, melt the 200g of chocolate using a double boiler or microwave. Pour the melted chocolate over the Rice Krispies cereal and mix well until the cereal is evenly coated. Spread the chocolate-coated cereal on a baking sheet lined with parchment paper and let it set for about 15 minutes. Sprinkle cocoa powder over the prepared Rice Krispies (whether using pre-made or homemade). Stir gently to coat the cereal evenly with cocoa powder. This adds a touch of bitterness that complements the sweetness of the other layers.
Step 8: Decorate and Chill
Sprinkle the chocolate-coated Rice Krispies mixture evenly over the chocolate ganache layer. Gently press the topping into the ganache to help it adhere. Cover the cake with plastic wrap and refrigerate for at least 4 hours, or preferably overnight, to allow the layers to set and the flavors to meld together.
Step 9: Serve and Enjoy!
Before serving, remove the cake from the refrigerator and let it sit at room temperature for about 15 minutes to soften slightly. This will make it easier to slice and serve. Cut the cake into slices or scoops and serve chilled.
COOKING Rating:
Easy
Serving Suggestions:
- Serve chilled as a dessert for any occasion.
- Pair with a scoop of vanilla ice cream or a dollop of whipped cream for an extra indulgent treat.
- Garnish with fresh berries (raspberries, strawberries, or blueberries) for a pop of color and flavor.
- Serve with a cup of coffee or tea for a perfect after-dinner treat.
Tips:
- For a richer chocolate flavor, use dark chocolate chips in the ganache.
- To prevent the cake from becoming too soggy, do not over-soak the cake base with the chocolate milk.
- If you don’t have instant cream powder, you can omit it, but the cream cheese filling may be slightly thinner.
- For a smoother ganache, strain the warm cream before pouring it over the chocolate chips.
- Store leftover cake in the refrigerator for up to 3 days.
- Adjust the amount of sweetened condensed milk to your desired level of sweetness.
- For a fun twist, try using different flavors of chocolate cake or add a layer of crushed cookies between the cream cheese filling and the ganache.
- Make sure the cream cheese is fully softened to avoid lumps in the filling.
Prep Time:
30 minutes
Cook Time:
0 minutes (no baking required)
Total Time:
30 minutes (plus 4 hours or overnight chilling time)
Nutritional Information: (Approximate, may vary based on specific ingredients used)
Calories:
Approximately 550-700 per serving (depending on serving size and ingredient choices)
Protein:
Approximately 8-12 grams per serving
Sodium:
Approximately 150-250 mg per serving
Conclusion
This Ahmed Al-Zamel Inspired No-Bake Chocolate Dream Cake is a testament to the fact that delicious desserts don’t always require hours of baking and complicated techniques. With its layers of moist chocolate cake, creamy filling, rich ganache, and crunchy topping, this cake is a sensory delight that’s sure to impress. The best part? It’s incredibly easy to make, making it a perfect option for any occasion. Whether you’re looking for a quick and easy dessert for a weeknight treat or a show-stopping centerpiece for a dinner party, this cake is guaranteed to be a hit. So, go ahead and give it a try! You might just discover your new favorite dessert.
Frequently Asked Questions:
Q1: Can I use a different type of cake for the base?
A: Absolutely! While chocolate cake is the traditional choice, you can experiment with other flavors like vanilla, red velvet, or even coffee cake. Just be sure to adjust the soaking liquid accordingly. For example, if using vanilla cake, you could soak it in vanilla-flavored milk or a simple syrup.
Q2: Can I make this cake ahead of time?
A: Yes, definitely! In fact, this cake is even better when made ahead of time, as it allows the flavors to meld together and the layers to set properly. You can prepare it up to 2 days in advance and store it in the refrigerator.
Q3: Is it necessary to use instant cream powder?
A: No, the instant cream powder is optional. It helps to stabilize the cream cheese filling and make it thicker, but the cake will still be delicious without it. If you don’t have any on hand, simply omit it. You can also use a tablespoon of cornstarch mixed with a tablespoon of cold water as a substitute.
Q4: Can I use a different type of chocolate for the ganache?
A: Of course! Feel free to use your favorite type of chocolate for the ganache. Dark chocolate will create a richer, more intense flavor, while milk chocolate will result in a sweeter, creamier ganache. You can also experiment with different flavor combinations, such as adding a touch of peppermint extract or espresso powder to the ganache.
Q5: How do I prevent the cake from becoming soggy?
A: The key to preventing a soggy cake is to not over-soak the cake base with the chocolate milk. Add the liquid gradually, allowing the cake to absorb it fully. The cake should be moist but not dripping wet. You can also use a slightly drier cake, such as a pound cake, to help prevent sogginess.
No-Bake Chocolate Dream Cake
Ingredients
- First Layer: Cake Base
- Ready-Made Chocolate Cake about 500g
- 1 cup Chocolate-flavored milk cocoa powder-infused milk, or chocolate sauce (adjust to desired moistness)
- Second Layer: Cream Cheese
- 280 grams 10 oz Cream Cheese, softened to room temperature
- 1 cup 240ml Heavy Cream (Liquid Cream), cold
- ½ can about 200g Sweetened Condensed Milk
- 1 packet about 30g Instant Cream Powder (optional, for extra thickness)
- Third Layer: Chocolate Sauce Ganache
- 1 ¼ cups 200g Chocolate Chips (dark, semi-sweet, or milk chocolate)
- 1 cup 240ml Heavy Cream, heated until almost simmering
- Final Layer: Decoration
- 2 cups Rice Krispies Chocolate Cereal or plain Rice Krispies mixed with melted chocolate
- 200 g Melted Chocolate for coating the Rice Krispies, if using plain cereal
- 2 tablespoons Cocoa Powder for dusting
Instructions
- Step 1: Prepare the Cake Base
- Cut the ready-made chocolate cake into approximately 1-inch cubes. Place the cake cubes in the bottom of a serving bowl or dish (a trifle bowl works beautifully, but any large bowl will do). Ensure the cake is evenly distributed to create a consistent base layer.
- Step 2: Soak the Cake Layer
- Slowly and evenly pour the chocolate-flavored milk (or cocoa powder-infused milk/chocolate sauce) over the cake cubes. Add the liquid gradually, allowing the cake to absorb it fully. The goal is to moisten the cake without making it soggy. You may not need to use all of the milk; use just enough to ensure the cake is thoroughly moistened. This step is crucial for adding flavor and creating a soft, melt-in-your-mouth texture.
- Step 3: Prepare the Cream Cheese Filling
- In a large bowl, combine the softened cream cheese and cold heavy cream. Using an electric mixer (either a stand mixer or a hand mixer), beat the mixture on medium speed until it is smooth and creamy. Be careful not to over-mix, as this can cause the cream cheese to become too thin. Gradually add the sweetened condensed milk and continue mixing until well combined. If desired, add the instant cream powder (this will help to stabilize the filling and make it thicker). Mix until the filling is smooth, thick, and holds its shape. Taste and adjust the sweetness if needed.
- Step 4: Layer the Cream Cheese Filling
- Carefully spoon the cream cheese filling over the soaked cake layer. Spread the filling evenly to create a smooth, consistent layer. Use an offset spatula or the back of a spoon to ensure the filling reaches all the edges of the bowl.
- Step 5: Prepare the Chocolate Ganache
- Place the chocolate chips in a heat-safe bowl. In a separate saucepan, heat the heavy cream over medium heat until it is just about to simmer. Remove the cream from the heat and pour it over the chocolate chips. Let the mixture sit for about a minute to allow the chocolate to melt. Gently stir the mixture until the chocolate is completely melted and the ganache is smooth and glossy. If there are any remaining lumps, microwave the mixture in 15-second intervals, stirring after each interval, until completely smooth.
- Step 6: Layer the Chocolate Ganache
- Pour the warm chocolate ganache over the cream cheese layer. Gently spread the ganache evenly to create a smooth, rich chocolate topping. Tilt the bowl to help the ganache spread to all the edges.
- Step 7: Prepare the Chocolate Rice Krispies Topping
- If using plain Rice Krispies cereal, melt the 200g of chocolate using a double boiler or microwave. Pour the melted chocolate over the Rice Krispies cereal and mix well until the cereal is evenly coated. Spread the chocolate-coated cereal on a baking sheet lined with parchment paper and let it set for about 15 minutes. Sprinkle cocoa powder over the prepared Rice Krispies (whether using pre-made or homemade). Stir gently to coat the cereal evenly with cocoa powder. This adds a touch of bitterness that complements the sweetness of the other layers.
- Step 8: Decorate and Chill
- Sprinkle the chocolate-coated Rice Krispies mixture evenly over the chocolate ganache layer. Gently press the topping into the ganache to help it adhere. Cover the cake with plastic wrap and refrigerate for at least 4 hours, or preferably overnight, to allow the layers to set and the flavors to meld together.
- Step 9: Serve and Enjoy!
- Before serving, remove the cake from the refrigerator and let it sit at room temperature for about 15 minutes to soften slightly. This will make it easier to slice and serve. Cut the cake into slices or scoops and serve chilled.

