Chocolate Easter Egg Nest Cake Recipe
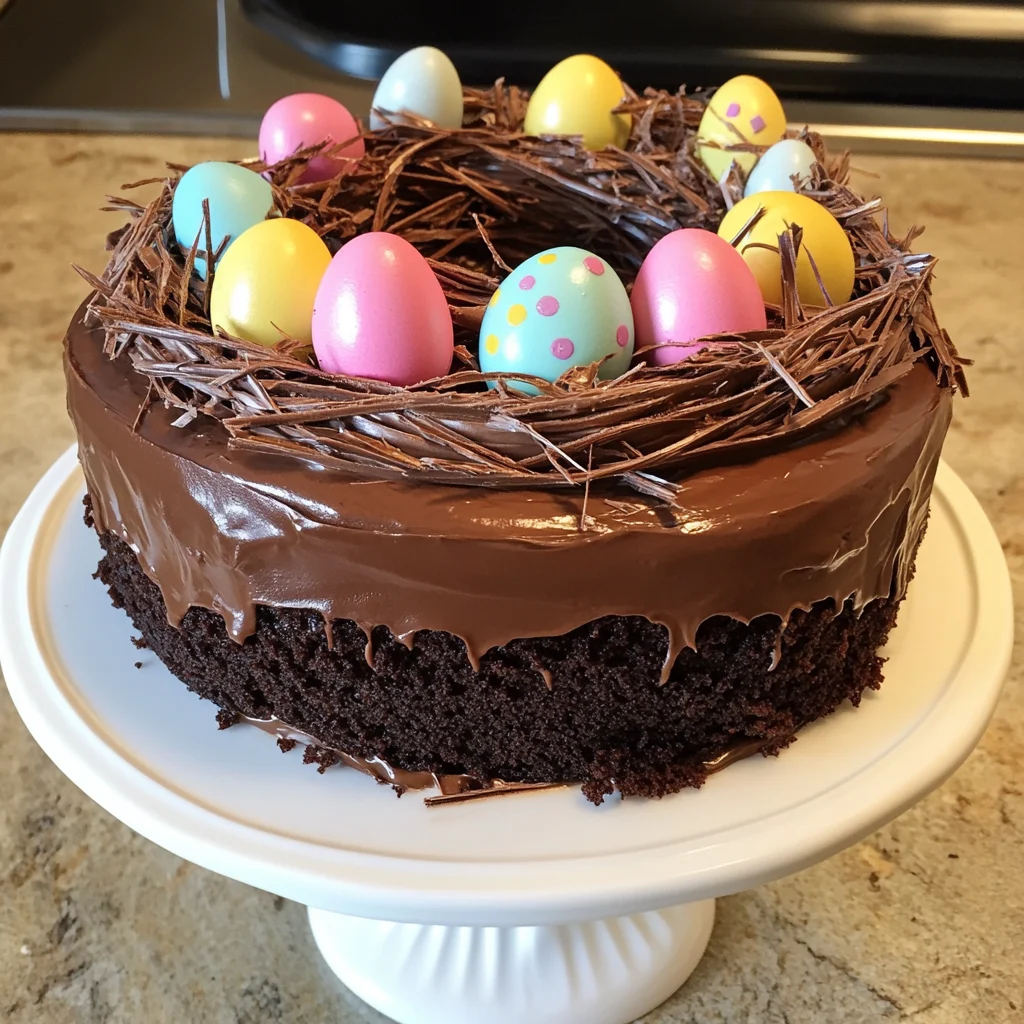
Description of this recipe: A decadent and festive chocolate cake adorned with a rich chocolate ganache and a whimsical chocolate nest filled with colorful mini Easter eggs. This cake is not only visually stunning but also incredibly delicious, making it the perfect centerpiece for your Easter celebration.
Why you will love this recipe: This recipe brings together the comforting flavors of a classic chocolate cake with the playful charm of Easter. The moist and tender cake, combined with the luscious ganache and the crunchy chocolate nest, offers a delightful textural contrast that will tantalize your taste buds. It’s a relatively straightforward recipe that delivers impressive results, sure to impress your family and friends. Plus, the decorating process is a fun and creative activity, especially if you involve children!
Introduction
Easter is a time for joy, celebration, and delicious food! While ham and other savory dishes often take center stage, no Easter feast is complete without a show-stopping dessert. Enter the Chocolate Easter Egg Nest Cake – a treat that’s as beautiful as it is delectable. This cake boasts a moist, rich chocolate base, a smooth and decadent chocolate ganache, and a stunning chocolate nest filled with miniature Easter eggs. It’s the perfect combination of flavors and textures, guaranteed to be a hit with both kids and adults alike. This recipe is designed to be approachable for home bakers of all skill levels, so gather your ingredients, put on your apron, and get ready to create a memorable Easter centerpiece!
Ingredients:
FOR THE CHOCOLATE CAKE
- 1 ¾ cups (220g) all-purpose flour
- ¾ cup (75g) unsweetened cocoa powder
- 2 cups (400g) granulated sugar
- 2 teaspoons baking powder
- 1 teaspoon baking soda
- ½ teaspoon salt
- 1 cup (240ml) buttermilk
- ½ cup (120ml) vegetable oil
- 2 large eggs
- 2 teaspoons vanilla extract
- 1 cup (240ml) hot water or coffee
FOR THE CHOCOLATE GANACHE
- 1 cup (240ml) heavy cream
- 8 oz (225g) dark chocolate, chopped
- 1 tablespoon unsalted butter
FOR THE CHOCOLATE NEST
- 6 oz (170g) dark chocolate, melted
- Parchment paper
- Mini chocolate eggs or candy-coated Easter eggs

Preparation:
Step 1: Prepare the Chocolate Cake
Preheat your oven to 350°F (175°C). This is crucial for even baking and prevents the cake from either burning on the outside or remaining undercooked in the center. Grease and line a 9-inch round cake pan with parchment paper. Greasing the pan ensures the cake doesn’t stick, while the parchment paper creates a smooth bottom, making it easy to remove the cake later. In a large mixing bowl, whisk together the flour, cocoa powder, sugar, baking powder, baking soda, and salt. Whisking these dry ingredients ensures they are evenly distributed, preventing clumps and ensuring a consistent texture in the final cake. The cocoa powder adds the deep chocolate flavor, while the baking powder and baking soda act as leavening agents, giving the cake its light and airy texture. Add the buttermilk, vegetable oil, eggs, and vanilla extract to the dry ingredients. The buttermilk adds moisture and a subtle tang, enhancing the chocolate flavor. Vegetable oil provides moisture and keeps the cake tender, while the eggs bind the ingredients together and contribute to the structure of the cake. Vanilla extract enhances the overall flavor profile. Mix until just well combined. Overmixing can develop the gluten in the flour, resulting in a tough cake. Be gentle and mix until the ingredients are just incorporated. Slowly stir in the hot water or coffee until fully incorporated; the batter will be thin. The hot liquid helps bloom the cocoa powder, intensifying the chocolate flavor. Coffee, if used, will also add a subtle depth to the flavor. The batter will be quite thin, which is normal for this type of cake. Pour the batter into the prepared pan and bake for 30-35 minutes, or until a toothpick inserted in the center comes out clean. Baking time may vary depending on your oven. Start checking the cake after 30 minutes by inserting a toothpick into the center. If it comes out clean or with a few moist crumbs, the cake is done. Let the cake cool in the pan for 10 minutes, then transfer it to a wire rack to cool completely. Cooling the cake in the pan slightly allows it to set and prevents it from breaking when you transfer it to the wire rack. It’s crucial that the cake is completely cool before adding the ganache to prevent it from melting.
Step 2: Make the Ganache
Heat the heavy cream in a saucepan over medium heat until it starts to simmer, but do not let it boil. Overheating the cream can cause it to scorch or separate. Simmering indicates that it’s hot enough to melt the chocolate properly. Remove from heat and pour over the chopped dark chocolate in a heat-proof bowl. Ensure the chocolate is finely chopped to facilitate even melting. Letting the chocolate sit in the hot cream for a few minutes allows it to soften and melt more easily. Let it sit for 2-3 minutes, then stir until smooth. Stir gently but thoroughly until all the chocolate is melted and the ganache is glossy and smooth. If some chocolate pieces remain, you can microwave the mixture in short 10-second bursts, stirring in between, until completely melted. Add the butter and stir until fully incorporated. The butter adds richness and shine to the ganache, creating a luxurious texture. Let the ganache cool slightly until it thickens but remains pourable. The ganache needs to thicken enough to coat the cake nicely but still be pourable. This usually takes about 15-20 minutes at room temperature. If it thickens too much, you can gently reheat it in short intervals, stirring in between, until it reaches the desired consistency.
Step 3: Create the Chocolate Nest
Melt the dark chocolate in a microwave-safe bowl using 30-second intervals, stirring between each, until smooth. This prevents the chocolate from burning. Alternatively, you can melt the chocolate using a double boiler. Transfer the melted chocolate to a piping bag or a small ziplock bag with the corner snipped off. Using a piping bag or ziplock bag allows for precise control when creating the nest. Lay a sheet of parchment paper on a baking tray, then pipe the chocolate in crisscrossing strands to form a circular nest shape. Be creative with your nest design! You can make it as rustic or as intricate as you like. Aim for a sturdy structure that will hold the Easter eggs. Place the tray in the refrigerator for 15-20 minutes, or until the chocolate nest is firm. Chilling the nest ensures it hardens completely and is easy to handle.
Step 4: Assemble the Cake
Place the cooled cake on a serving platter. Ensure the cake is completely cooled before proceeding. Pour the chocolate ganache over the cake, letting it drip down the sides. Pour the ganache slowly and evenly, allowing it to coat the entire cake. Carefully peel the chocolate nest from the parchment paper and place it on top of the cake. Gently peel the nest from the parchment paper, being careful not to break it. If it sticks, you can gently warm the parchment paper underneath with a hairdryer for a few seconds. Fill the nest with mini chocolate eggs before serving. Arrange the mini eggs artfully in the nest to create a beautiful and festive display.
Step 5: Enjoy
Serve your beautiful and delicious Chocolate Easter Egg Nest Cake!
COOKING Rating:
Intermediate
Serving Suggestions:
- Serve slices of the cake with a scoop of vanilla ice cream or a dollop of whipped cream.
- Accompany the cake with fresh berries for a burst of fruity flavor.
- Enjoy a slice of cake with a cup of coffee or tea for a delightful afternoon treat.
- Garnish with edible flowers for an extra touch of elegance.
Tips:
- Let the cake cool completely before adding the ganache to prevent it from melting too quickly.
- For a more intense chocolate flavor, use coffee instead of hot water in the cake batter.
- If the ganache thickens too much before pouring, gently reheat it in short intervals until it reaches a smooth consistency.
- When making the chocolate nest, work quickly to pipe the chocolate before it starts to set.
- To make the cake ahead of time, bake the cake layers and prepare the ganache separately. Store them in airtight containers at room temperature until ready to assemble.
Prep Time:
30 minutes
Cook Time:
35 minutes
Additional Time:
30 minutes
Total Time:
1 hour 35 minutes
Nutritional Information:
(Estimated, per serving – varies based on specific ingredients used)
- Calories: 450-550
- Protein: 5-7g
- Sodium: 200-300mg
Conclusion
The Chocolate Easter Egg Nest Cake is more than just a dessert; it’s a celebration of spring, family, and the joy of baking. With its moist chocolate cake, luscious ganache, and whimsical chocolate nest, this cake is sure to be the star of your Easter gathering. Enjoy the process of creating this delightful treat, and savor every delicious bite!
Frequently Asked Questions:
Q1: Can I use a different type of chocolate for the ganache and nest?
A1: Absolutely! Feel free to experiment with different types of chocolate, such as milk chocolate, white chocolate, or even flavored chocolate. Keep in mind that the sweetness and richness of the ganache will vary depending on the type of chocolate you choose. For the nest, dark chocolate provides a nice contrast to the sweetness of the cake and ganache, but milk chocolate can also work well, especially if you prefer a sweeter nest.
Q2: Can I make the cake gluten-free?
A2: Yes, you can easily adapt this recipe to be gluten-free. Simply substitute the all-purpose flour with a gluten-free all-purpose flour blend. Make sure to use a blend that contains xanthan gum or add a small amount (about ½ teaspoon) to the flour mixture to help bind the ingredients together and prevent the cake from being crumbly.
Q3: Can I freeze the cake?
A3: Yes, you can freeze the cake, either whole or in slices. Wrap the cake tightly in plastic wrap and then in aluminum foil before freezing. For best results, freeze the cake without the ganache and chocolate nest. When ready to serve, thaw the cake in the refrigerator overnight and then frost with the ganache and add the nest. The ganache can also be frozen separately in an airtight container.
Q4: How long will the cake last?
A4: The cake will last for up to two days at room temperature or up to five days in the refrigerator. Store the cake in an airtight container to prevent it from drying out. The chocolate nest may soften slightly when stored in the refrigerator due to humidity, so it’s best to add it just before serving if possible.
Q5: Can I add other decorations to the cake?
A5: Of course! Feel free to get creative with your decorations. You can add sprinkles, edible glitter, candy flowers, or even fondant decorations to enhance the Easter theme. Get the kids involved and let them personalize their slices with their favorite toppings. The possibilities are endless! The chocolate nest can also be decorated with edible glitter or painted with edible gold dust for a touch of shimmer.

Chocolate Easter Egg Nest Cake Recipe
Ingredients
- FOR THE CHOCOLATE CAKE
- 1 ¾ cups 220g all-purpose flour
- ¾ cup 75g unsweetened cocoa powder
- 2 cups 400g granulated sugar
- 2 teaspoons baking powder
- 1 teaspoon baking soda
- ½ teaspoon salt
- 1 cup 240ml buttermilk
- ½ cup 120ml vegetable oil
- 2 large eggs
- 2 teaspoons vanilla extract
- 1 cup 240ml hot water or coffee
- FOR THE CHOCOLATE GANACHE
- 1 cup 240ml heavy cream
- 8 oz 225g dark chocolate, chopped
- 1 tablespoon unsalted butter
- FOR THE CHOCOLATE NEST
- 6 oz 170g dark chocolate, melted
- Parchment paper
- Mini chocolate eggs or candy-coated Easter eggs
Instructions
- Step 1: Prepare the Chocolate Cake
- Preheat your oven to 350°F (175°C). This is crucial for even baking and prevents the cake from either burning on the outside or remaining undercooked in the center. Grease and line a 9-inch round cake pan with parchment paper. Greasing the pan ensures the cake doesn’t stick, while the parchment paper creates a smooth bottom, making it easy to remove the cake later. In a large mixing bowl, whisk together the flour, cocoa powder, sugar, baking powder, baking soda, and salt. Whisking these dry ingredients ensures they are evenly distributed, preventing clumps and ensuring a consistent texture in the final cake. The cocoa powder adds the deep chocolate flavor, while the baking powder and baking soda act as leavening agents, giving the cake its light and airy texture. Add the buttermilk, vegetable oil, eggs, and vanilla extract to the dry ingredients. The buttermilk adds moisture and a subtle tang, enhancing the chocolate flavor. Vegetable oil provides moisture and keeps the cake tender, while the eggs bind the ingredients together and contribute to the structure of the cake. Vanilla extract enhances the overall flavor profile. Mix until just well combined. Overmixing can develop the gluten in the flour, resulting in a tough cake. Be gentle and mix until the ingredients are just incorporated. Slowly stir in the hot water or coffee until fully incorporated; the batter will be thin. The hot liquid helps bloom the cocoa powder, intensifying the chocolate flavor. Coffee, if used, will also add a subtle depth to the flavor. The batter will be quite thin, which is normal for this type of cake. Pour the batter into the prepared pan and bake for 30-35 minutes, or until a toothpick inserted in the center comes out clean. Baking time may vary depending on your oven. Start checking the cake after 30 minutes by inserting a toothpick into the center. If it comes out clean or with a few moist crumbs, the cake is done. Let the cake cool in the pan for 10 minutes, then transfer it to a wire rack to cool completely. Cooling the cake in the pan slightly allows it to set and prevents it from breaking when you transfer it to the wire rack. It’s crucial that the cake is completely cool before adding the ganache to prevent it from melting.
- Step 2: Make the Ganache
- Heat the heavy cream in a saucepan over medium heat until it starts to simmer, but do not let it boil. Overheating the cream can cause it to scorch or separate. Simmering indicates that it’s hot enough to melt the chocolate properly. Remove from heat and pour over the chopped dark chocolate in a heat-proof bowl. Ensure the chocolate is finely chopped to facilitate even melting. Letting the chocolate sit in the hot cream for a few minutes allows it to soften and melt more easily. Let it sit for 2-3 minutes, then stir until smooth. Stir gently but thoroughly until all the chocolate is melted and the ganache is glossy and smooth. If some chocolate pieces remain, you can microwave the mixture in short 10-second bursts, stirring in between, until completely melted. Add the butter and stir until fully incorporated. The butter adds richness and shine to the ganache, creating a luxurious texture. Let the ganache cool slightly until it thickens but remains pourable. The ganache needs to thicken enough to coat the cake nicely but still be pourable. This usually takes about 15-20 minutes at room temperature. If it thickens too much, you can gently reheat it in short intervals, stirring in between, until it reaches the desired consistency.
- Step 3: Create the Chocolate Nest
- Melt the dark chocolate in a microwave-safe bowl using 30-second intervals, stirring between each, until smooth. This prevents the chocolate from burning. Alternatively, you can melt the chocolate using a double boiler. Transfer the melted chocolate to a piping bag or a small ziplock bag with the corner snipped off. Using a piping bag or ziplock bag allows for precise control when creating the nest. Lay a sheet of parchment paper on a baking tray, then pipe the chocolate in crisscrossing strands to form a circular nest shape. Be creative with your nest design! You can make it as rustic or as intricate as you like. Aim for a sturdy structure that will hold the Easter eggs. Place the tray in the refrigerator for 15-20 minutes, or until the chocolate nest is firm. Chilling the nest ensures it hardens completely and is easy to handle.
- Step 4: Assemble the Cake
- Place the cooled cake on a serving platter. Ensure the cake is completely cooled before proceeding. Pour the chocolate ganache over the cake, letting it drip down the sides. Pour the ganache slowly and evenly, allowing it to coat the entire cake. Carefully peel the chocolate nest from the parchment paper and place it on top of the cake. Gently peel the nest from the parchment paper, being careful not to break it. If it sticks, you can gently warm the parchment paper underneath with a hairdryer for a few seconds. Fill the nest with mini chocolate eggs before serving. Arrange the mini eggs artfully in the nest to create a beautiful and festive display.
- Step 5: Enjoy
- Serve your beautiful and delicious Chocolate Easter Egg Nest Cake!