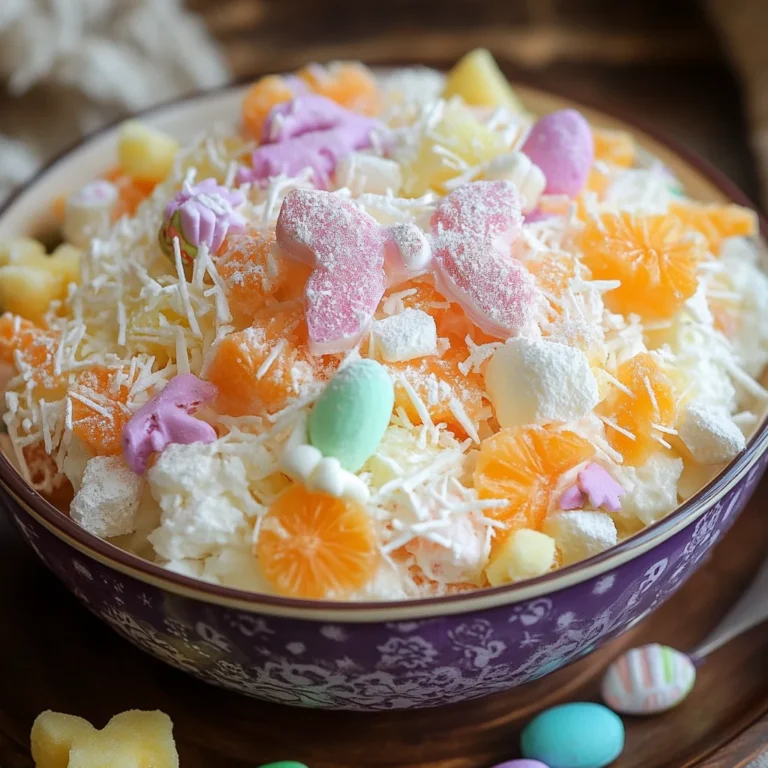
Easter Dip Recipe
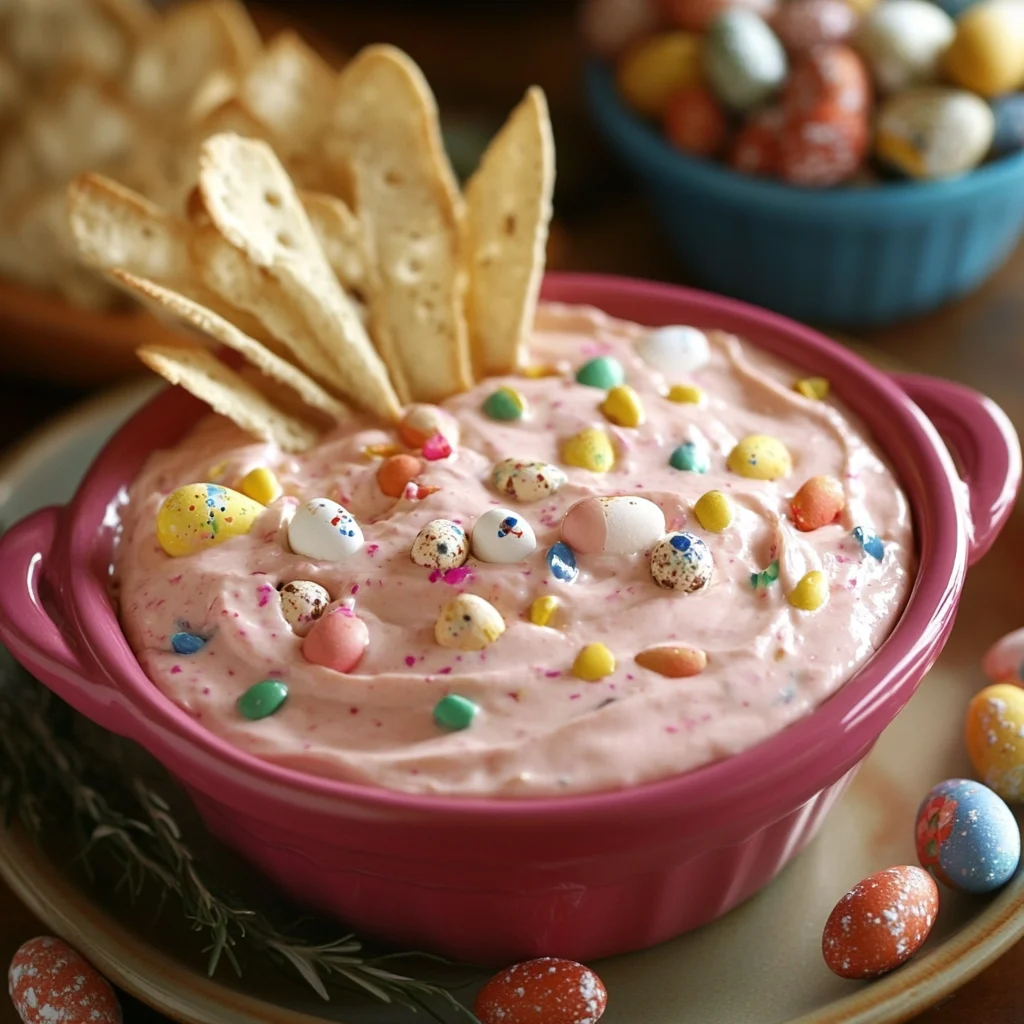
Description: This Easter Dip is a delightful, creamy confection, bursting with spring colors and vanilla sweetness. It’s incredibly easy to make and guaranteed to be a crowd-pleaser at any Easter gathering, springtime party, or even just as a fun, festive treat at home. Imagine a bowl of light pink, speckled creaminess surrounded by an array of delicious dippers – that’s the magic of this Easter Dip!
Why You’ll Love This Recipe:
- Effortless Elegance: This recipe requires minimal effort for maximum impact. With just a few simple ingredients and a straightforward method, you can whip up a show-stopping dip in under an hour.
- Customizable Color Palette: The pastel pink hue is perfect for Easter, but you can easily customize the color to match any spring theme or personal preference. Get creative with the food coloring and create a rainbow of pastel delights!
- Kid-Friendly Fun: This dip is a hit with kids of all ages! They’ll love the sweet flavor, creamy texture, and, of course, the colorful sprinkles. It’s a great way to get them involved in the kitchen, too.
- Versatile Dipping Options: From classic graham crackers and pretzels to fresh strawberries and marshmallows, the possibilities for dipping are endless. Tailor the dippers to your guests’ preferences and create a fun and interactive dessert experience.
- Perfect Make-Ahead Treat: This dip actually tastes better after it’s had some time to chill, allowing the flavors to meld together. This makes it a perfect make-ahead treat for busy hosts.
Introduction
Easter is a time for celebrating renewal, joy, and of course, delicious treats! This Easter Dip is the perfect addition to your holiday spread, offering a light, refreshing, and visually appealing dessert option that everyone will adore. This recipe takes a classic creamy dip and elevates it with pastel colors and festive sprinkles, creating a truly special and memorable treat. Whether you’re hosting a large Easter brunch or simply want to add a touch of springtime magic to your home, this dip is the answer. It’s quick, easy, and guaranteed to bring smiles to everyone’s faces. So, gather your ingredients, grab your favorite dippers, and get ready to create a pastel paradise in a bowl!
Ingredients:
- 1 package (8 oz) cream cheese, softened
- 1 container (8 oz) whipped topping (e.g., Cool Whip)
- 1/2 cup powdered sugar
- 1 teaspoon vanilla extract
- A few drops of pink food coloring (or any pastel color of your choice)
- 1/2 cup pastel-colored sprinkles or mini candies (e.g., M&M’s or mini eggs), divided
- Optional: 1/4 cup marshmallow fluff
- For Dippers:
- Graham crackers
- Pretzels
- Strawberries
- Marshmallows
- Other options: Apple slices, vanilla wafers, animal crackers, rice cakes, carrot sticks (for a sweet and savory combo!)

Preparation:
Step 1: Beat the Cream Cheese
Begin by ensuring your cream cheese is properly softened. This is crucial for a smooth and lump-free dip. Place the softened cream cheese in a large mixing bowl. Using an electric mixer (either a stand mixer or a handheld mixer), beat the cream cheese on medium speed until it is light, fluffy, and completely free of any lumps. This usually takes about 2-3 minutes. Scrape down the sides of the bowl with a spatula as needed to ensure all the cream cheese is evenly beaten. Properly creamed cream cheese is the foundation for a wonderfully smooth and creamy dip.
Step 2: Add the Sweetness
Once the cream cheese is perfectly smooth, it’s time to add the sweetness. Gradually add the powdered sugar to the cream cheese, mixing on low speed to avoid a cloud of powdered sugar erupting from the bowl. Mix until the powdered sugar is fully incorporated and the mixture is smooth and creamy. Then, add the vanilla extract. The vanilla enhances the overall sweetness and adds a touch of warmth and complexity to the flavor profile. Mix until the vanilla is evenly distributed throughout the mixture. If you’re using marshmallow fluff, now is the time to gently fold it in. Marshmallow fluff adds an extra layer of sweetness and a delightfully gooey texture to the dip. Be careful not to overmix, as this can deflate the dip.
Step 3: Fold in the Whipped Topping
The whipped topping adds lightness and airiness to the dip. Gently fold in the whipped topping into the cream cheese mixture until it is fully incorporated. Be careful not to overmix, as this can cause the whipped topping to deflate and result in a less airy dip. Use a light hand and a folding motion, working from the bottom of the bowl upwards, to ensure the whipped topping is evenly distributed without losing its volume.
Step 4: Add the Color and Sprinkles
Now comes the fun part: adding the color and sprinkles! Add a few drops of pink food coloring (or your preferred pastel color) to the dip. Start with just a few drops and gradually add more until you achieve your desired shade. Remember, a little goes a long way! Gently stir in the food coloring until it is evenly distributed throughout the dip. Once the color is to your liking, fold in half of the pastel sprinkles or mini candies. Reserve the remaining sprinkles for garnishing the top of the dip. The sprinkles add a festive touch and a delightful burst of color and texture to every bite.
Step 5: Chill and Serve
Transfer the prepared dip to a serving bowl. Smooth out the top of the dip with a spatula and then generously garnish with the remaining sprinkles or candies. This adds a final touch of visual appeal and ensures that every spoonful is packed with colorful goodness. Cover the bowl with plastic wrap and chill the dip in the refrigerator for at least 30 minutes before serving. This chilling time allows the flavors to meld together and the dip to firm up slightly, resulting in a more cohesive and delicious experience. Serve the dip with your favorite dippers and enjoy!
COOKING Rating:
- Ease of Preparation: 5/5 (Extremely Easy)
- Ingredient Accessibility: 5/5 (Common Ingredients)
- Overall Deliciousness: 5/5 (Highly Recommended)
Serving Suggestions:
- Arrange the dip in a beautiful serving bowl surrounded by an array of your favorite dippers.
- Create a visually appealing platter with different colors and textures of dippers.
- Serve the dip at room temperature or slightly chilled for optimal flavor and texture.
- Consider adding a small spoon or knife for easy serving.
- For a fun twist, serve the dip in individual mini dessert cups.
Tips:
- Make sure the cream cheese is completely softened to avoid lumps in the dip.
- Don’t overmix the dip, as this can cause it to become dense.
- Adjust the amount of food coloring to achieve your desired shade of pastel.
- Get creative with the sprinkles and candies! Use a variety of shapes, sizes, and colors to create a visually stunning dip.
- For a richer flavor, use full-fat cream cheese.
- Store leftover dip in an airtight container in the refrigerator for up to 3 days.
Prep Time: 10 minutes
Cook Time: 3 minutes (for softening cream cheese, if needed)
Additional Time: 30 minutes (chilling time)
Total Time: 43 minutes
Nutritional Information:
Note: Nutritional information is an estimate and may vary depending on specific ingredients and portion sizes.
- Calories: Approximately 250-300 calories per serving
- Protein: Approximately 3-4 grams per serving
- Sodium: Approximately 100-150 mg per serving
Conclusion
This Easter Dip is more than just a recipe; it’s a celebration of spring, sweetness, and simple joys. Its vibrant colors, creamy texture, and customizable flavors make it a perfect addition to any Easter gathering or springtime celebration. So, gather your ingredients, get creative with the sprinkles, and prepare to wow your guests with this effortless and delicious pastel paradise. Happy dipping!
Q&A:
Q1: Can I make this dip ahead of time?
A: Absolutely! In fact, this dip tastes even better after it has had some time to chill in the refrigerator, allowing the flavors to meld together. You can easily make it a day or two in advance. Just store it in an airtight container in the refrigerator until you’re ready to serve.
Q2: Can I use different types of sprinkles or candies?
A: Of course! Feel free to get creative with the sprinkles and candies you use. Pastel-colored sprinkles, mini M&M’s, mini chocolate eggs, or even edible glitter would all be great additions. Choose whatever suits your theme and personal preferences!
Q3: What if I don’t have powdered sugar? Can I use granulated sugar instead?
A: While powdered sugar is preferred for its smooth texture, you can use granulated sugar as a substitute. However, you’ll need to process the granulated sugar in a food processor or blender until it becomes a fine powder. This will help prevent a grainy texture in the dip.
Q4: Can I make this dip dairy-free or vegan?
A: Yes, with a few substitutions! You can use dairy-free cream cheese, whipped topping, and sprinkles to create a vegan-friendly version of this dip. Look for these alternatives at your local grocery store or health food store.
Q5: What are some other fun dippers I could use besides the ones listed?
A: The possibilities are endless! Consider using apple slices, vanilla wafers, animal crackers, rice cakes, or even carrot sticks for a sweet and savory combination. You can also try dipping different types of cookies, pretzels, or fresh fruit. Get creative and experiment with different flavors and textures!

Easter Dip Recipe
Ingredients
- 1 package 8 oz cream cheese, softened
- 1 container 8 oz whipped topping (e.g., Cool Whip)
- 1/2 cup powdered sugar
- 1 teaspoon vanilla extract
- A few drops of pink food coloring or any pastel color you prefer
- 1/2 cup pastel-colored sprinkles or mini candies e.g., M&M’s or mini eggs
- Optional: 1/4 cup marshmallow fluff
- For Dippers:
- Graham crackers
- Pretzels
- Strawberries
- Marshmallows
Instructions
- Step 1: Beat the Cream Cheese:
- In a large mixing bowl, use an electric mixer to beat the softened cream cheese until smooth and creamy. This is a crucial step to ensure a lump-free dip. If the cream cheese is still cold, it will be difficult to achieve a smooth consistency. Continue beating until the cream cheese is light and airy. The smoother the cream cheese, the better the final texture of the dip will be. Don’t rush this step; a well-beaten cream cheese base is essential for a perfectly creamy dip.
- Step 2: Add the Sweetness:
- Gradually mix in the powdered sugar and vanilla extract, beating until fully combined. Add the powdered sugar a little at a time to prevent it from creating a cloud of dust. The vanilla extract enhances the overall flavor of the dip, adding a warm and comforting note. If using marshmallow fluff, gently fold it in now for an extra layer of creamy texture and sweetness. Be careful not to overmix, as this can deflate the whipped topping in the next step.
- Step 3: Fold in the Whipped Topping:
- Gently fold in the whipped topping until the mixture becomes light and fluffy. This step is key to achieving the signature airy texture of this dip. Use a spatula and a light hand to incorporate the whipped topping without deflating it. Ensure all ingredients are fully incorporated, but avoid overmixing, which can result in a dense dip. Fold until just combined, leaving a few streaks of whipped topping visible.
- Step 4: Add the Color and Sprinkles:
- Stir in a few drops of pink food coloring to achieve your desired shade. Remember, a little food coloring goes a long way, so start with a small amount and add more until you reach your desired hue. You can also experiment with other pastel colors, such as light blue, yellow, or green. Fold in half of the pastel sprinkles or candies, reserving the rest for garnish. Gently fold in the sprinkles to distribute them evenly throughout the dip. The sprinkles add a festive touch and a delightful crunch to the creamy texture.
- Step 5: Chill and Serve:
- Transfer the dip to a serving bowl and garnish with the remaining sprinkles or candies on top. Chill the dip for at least 30 minutes before serving to allow the flavors to meld and the dip to firm up slightly. This chilling period also allows the sprinkles to adhere better to the top of the dip. The dip can be chilled for up to 2 hours for optimal flavor and texture.