Step 1: In a medium bowl, whisk together the flour, baking soda, salt, and cinnamon. Whisking ensures that these dry ingredients are evenly distributed, which is crucial for a consistent cookie texture. The cinnamon adds a warm, comforting spice that complements the apples and caramel beautifully. Set this mixture aside.
Step 2: In a stand mixer fitted with the paddle attachment (or using a hand mixer), cream the butter and both sugars until light and fluffy, about 5 minutes. This step is crucial for achieving the perfect texture. Don’t rush it! Creaming incorporates air into the butter and sugar mixture, creating a light and airy base for the cookies. The light brown sugar adds a subtle molasses flavor and contributes to the cookies' chewiness. Ensure your butter is truly at room temperature – soft enough to easily cream but not melted.
Step 3: Beat in the eggs one at a time, then the vanilla extract, scraping down the sides of the bowl as needed. Adding the eggs one at a time allows them to fully incorporate into the mixture, creating a smoother and more emulsified dough. Don't forget to scrape down the sides of the bowl periodically to ensure that all ingredients are evenly combined. The vanilla extract enhances the overall flavor of the cookies, adding a touch of warmth and complexity.
Step 4: Gradually mix in the dry ingredients until just combined. Be careful not to overmix the dough, as this can lead to tough cookies. Mix until the dry ingredients are just incorporated and no streaks of flour remain. The dough will be quite thick, which is perfectly normal.
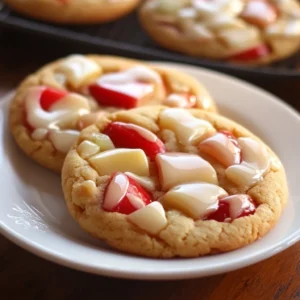
Step 5: Pat the diced apple pieces very dry with paper towels. This is an important step! Excess moisture from the apples can make the cookies soggy. Gently fold in the diced apples and caramel bits by hand. Folding prevents overmixing and ensures that the apples and caramel bits are evenly distributed throughout the dough. Using Granny Smith apples provides a tartness that balances the sweetness of the caramel and candy coating. Make sure the apples are diced into small, uniform pieces (about ¼-inch) for even distribution.
Step 6: Cover the dough tightly with plastic wrap and refrigerate for at least 2 hours or overnight. Chilling the dough is essential for several reasons. It allows the gluten in the flour to relax, which results in a more tender cookie. It also allows the flavors to meld together and the butter to solidify, which prevents the cookies from spreading too much during baking. If you’re short on time, 2 hours is sufficient, but overnight chilling is ideal.
Step 7: When ready to bake, preheat the oven to 350°F (175°C). Line baking sheets with silicone mats or parchment paper. This prevents the cookies from sticking to the baking sheets and ensures even baking. Using silicone mats is a great option for easy cleanup.
Step 8: Scoop the chilled dough into 2-tablespoon balls and place them 2 inches apart on the prepared baking sheets. Using a cookie scoop helps ensure that the cookies are uniform in size, which is important for even baking. Leaving enough space between the cookies allows them to spread without sticking together.
Step 9: Bake for 12-14 minutes, or until the edges are lightly golden but the centers still look slightly underbaked. Don’t overbake the cookies, as this can make them dry and crumbly. The slight underbaking ensures that the cookies remain soft and chewy. Keep a close eye on the cookies during the last few minutes of baking, as oven temperatures can vary.
Step 10: Cool the cookies on the baking sheets for 5 minutes, then transfer them to wire racks to cool completely. Allowing the cookies to cool slightly on the baking sheets before transferring them to wire racks helps them retain their shape and prevents them from breaking.
Step 11: Melt the candy melts according to package directions. Be careful not to overheat the candy melts, as this can cause them to seize up and become unusable. A double boiler or microwave-safe bowl are both good options for melting the candy melts.
Step 12: Dip each cooled cookie halfway into the melted candy, or drizzle over top. Place the dipped or drizzled cookies on wax paper until the coating sets. Dipping the cookies provides a more uniform candy coating, while drizzling creates a more rustic look. Work quickly, as the candy coating will start to set quickly.