Step 1: Prepare the Chocolate Cake
Preheat your oven to 350°F (175°C). This is crucial for even baking and prevents the cake from either burning on the outside or remaining undercooked in the center. Grease and line a 9-inch round cake pan with parchment paper. Greasing the pan ensures the cake doesn't stick, while the parchment paper creates a smooth bottom, making it easy to remove the cake later. In a large mixing bowl, whisk together the flour, cocoa powder, sugar, baking powder, baking soda, and salt. Whisking these dry ingredients ensures they are evenly distributed, preventing clumps and ensuring a consistent texture in the final cake. The cocoa powder adds the deep chocolate flavor, while the baking powder and baking soda act as leavening agents, giving the cake its light and airy texture. Add the buttermilk, vegetable oil, eggs, and vanilla extract to the dry ingredients. The buttermilk adds moisture and a subtle tang, enhancing the chocolate flavor. Vegetable oil provides moisture and keeps the cake tender, while the eggs bind the ingredients together and contribute to the structure of the cake. Vanilla extract enhances the overall flavor profile. Mix until just well combined. Overmixing can develop the gluten in the flour, resulting in a tough cake. Be gentle and mix until the ingredients are just incorporated. Slowly stir in the hot water or coffee until fully incorporated; the batter will be thin. The hot liquid helps bloom the cocoa powder, intensifying the chocolate flavor. Coffee, if used, will also add a subtle depth to the flavor. The batter will be quite thin, which is normal for this type of cake. Pour the batter into the prepared pan and bake for 30-35 minutes, or until a toothpick inserted in the center comes out clean. Baking time may vary depending on your oven. Start checking the cake after 30 minutes by inserting a toothpick into the center. If it comes out clean or with a few moist crumbs, the cake is done. Let the cake cool in the pan for 10 minutes, then transfer it to a wire rack to cool completely. Cooling the cake in the pan slightly allows it to set and prevents it from breaking when you transfer it to the wire rack. It's crucial that the cake is completely cool before adding the ganache to prevent it from melting.
Step 2: Make the Ganache
Heat the heavy cream in a saucepan over medium heat until it starts to simmer, but do not let it boil. Overheating the cream can cause it to scorch or separate. Simmering indicates that it's hot enough to melt the chocolate properly. Remove from heat and pour over the chopped dark chocolate in a heat-proof bowl. Ensure the chocolate is finely chopped to facilitate even melting. Letting the chocolate sit in the hot cream for a few minutes allows it to soften and melt more easily. Let it sit for 2-3 minutes, then stir until smooth. Stir gently but thoroughly until all the chocolate is melted and the ganache is glossy and smooth. If some chocolate pieces remain, you can microwave the mixture in short 10-second bursts, stirring in between, until completely melted. Add the butter and stir until fully incorporated. The butter adds richness and shine to the ganache, creating a luxurious texture. Let the ganache cool slightly until it thickens but remains pourable. The ganache needs to thicken enough to coat the cake nicely but still be pourable. This usually takes about 15-20 minutes at room temperature. If it thickens too much, you can gently reheat it in short intervals, stirring in between, until it reaches the desired consistency.
Step 3: Create the Chocolate Nest
Melt the dark chocolate in a microwave-safe bowl using 30-second intervals, stirring between each, until smooth. This prevents the chocolate from burning. Alternatively, you can melt the chocolate using a double boiler. Transfer the melted chocolate to a piping bag or a small ziplock bag with the corner snipped off. Using a piping bag or ziplock bag allows for precise control when creating the nest. Lay a sheet of parchment paper on a baking tray, then pipe the chocolate in crisscrossing strands to form a circular nest shape. Be creative with your nest design! You can make it as rustic or as intricate as you like. Aim for a sturdy structure that will hold the Easter eggs. Place the tray in the refrigerator for 15-20 minutes, or until the chocolate nest is firm. Chilling the nest ensures it hardens completely and is easy to handle.
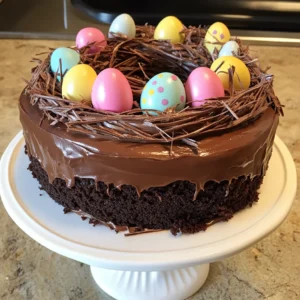
Step 4: Assemble the Cake
Place the cooled cake on a serving platter. Ensure the cake is completely cooled before proceeding. Pour the chocolate ganache over the cake, letting it drip down the sides. Pour the ganache slowly and evenly, allowing it to coat the entire cake. Carefully peel the chocolate nest from the parchment paper and place it on top of the cake. Gently peel the nest from the parchment paper, being careful not to break it. If it sticks, you can gently warm the parchment paper underneath with a hairdryer for a few seconds. Fill the nest with mini chocolate eggs before serving. Arrange the mini eggs artfully in the nest to create a beautiful and festive display.
Step 5: Enjoy
Serve your beautiful and delicious Chocolate Easter Egg Nest Cake!