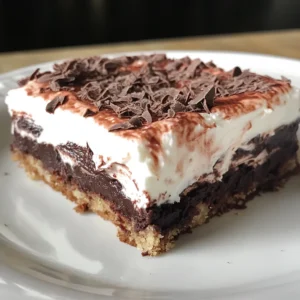
Step 1: Preparing the Nut Crust
Preheat your oven to 350°F (175°C). In a medium-sized mixing bowl, combine the all-purpose flour, melted butter, and chopped pecans. Mix thoroughly until the ingredients are evenly distributed and the mixture resembles coarse crumbs. This is the foundation of your Chocolate Dream, so ensure that all ingredients are well incorporated. The melted butter should bind the flour and pecans together, creating a slightly moist mixture.
Step 2: Baking the Crust
Press the nut mixture evenly into the bottom of a 9x13 inch baking dish. Use the back of a spoon or your fingers to create a uniform layer, ensuring that the crust is compact and even. A well-pressed crust will prevent it from crumbling when you slice and serve the dessert. Bake in the preheated oven for 15 minutes, or until the crust is lightly golden brown and fragrant. Keep a close eye on it to prevent burning. The nutty aroma will fill your kitchen, signaling that the crust is ready.
Step 3: Cooling the Crust
Remove the baking dish from the oven and allow the crust to cool completely to room temperature. This step is crucial because adding warm layers on top of a hot crust can cause the dessert to become soggy. Cooling the crust allows it to firm up, creating a stable base for the subsequent layers. Place the baking dish on a wire rack to facilitate even cooling. You can speed up the process by placing it in the refrigerator for a short period.
Step 4: Preparing the Whipped Cream Cheese Layer
In a large mixing bowl, using an electric mixer, cream together the softened cream cheese and powdered sugar until the mixture is smooth and fluffy. Ensure that the cream cheese is at room temperature to avoid lumps and to achieve a creamy consistency. Beat the mixture on medium speed for about 2-3 minutes until it is light and airy. Then, gently fold in half of the thawed Cool Whip until it is fully incorporated. Be careful not to overmix, as this can cause the Cool Whip to deflate.
Step 5: Layering the Cream Cheese Mixture
Scoop the cream cheese mixture on top of the cooled nut crust and spread it evenly. Use a spatula or the back of a spoon to create a smooth, uniform layer. This layer should completely cover the crust, providing a creamy and tangy counterpoint to the other layers. Allow this layer to set in the refrigerator for about 15-20 minutes before adding the chocolate pudding layer. This will help prevent the pudding from seeping into the crust.
Step 6: Preparing the Chocolate Pudding Layer
In a separate mixing bowl, whisk together the instant chocolate pudding mixes and milk until well combined and smooth. Follow the instructions on the pudding mix box for the best results. Continue whisking for about 2 minutes until the pudding starts to thicken. The mixture should be free of lumps and have a smooth, velvety texture.
Step 7: Layering the Chocolate Pudding
Gently pour the chocolate pudding mixture over the cream cheese layer. Spread it evenly using a spatula or the back of a spoon, ensuring that all of the cream cheese is covered. This will create a rich and decadent chocolate layer that complements the creamy and nutty flavors of the other layers. Be gentle when spreading the pudding to avoid disturbing the cream cheese layer.
Step 8: Adding the Whipped Topping
Carefully spread the remaining Cool Whip (the other half of the tub) on top of the chocolate pudding layer. Create a smooth and even layer that covers the entire surface of the dessert. You can use a spatula or a piping bag to achieve a decorative finish.
Step 9: Chilling and Setting
Cover the baking dish with plastic wrap and chill the completed Chocolate Dream in the refrigerator for at least 1 hour, or preferably longer, to allow all the layers to set completely. The longer it chills, the better the flavors will meld together and the easier it will be to slice and serve.
Step 10: Adding Toppings (Optional)
Before serving, you can add your favorite toppings to enhance the flavor and presentation of the Chocolate Dream. Sprinkle with chocolate shavings, chopped pecans, fresh berries, chocolate syrup, or mini chocolate chips. Get creative and customize the toppings to your liking.
