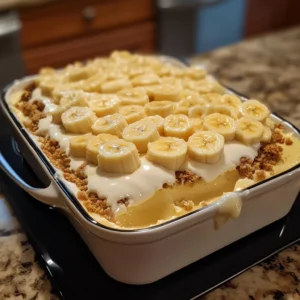
Step 1: Prepare the Base
Begin by grabbing a 13x9 inch dish. This size is perfect for accommodating all the delicious layers of our Banana Cream Dream. The first step is to create a sturdy and flavorful base. Open one bag of your chosen cookies – either Pepperidge Farm Chessmen or Vanilla Wafers – and begin lining the bottom of the dish. Arrange the cookies in a single layer, ensuring that the entire bottom surface is covered. This cookie layer will provide a delightful crunch that contrasts beautifully with the creamy filling to come. Don’t worry if you need to break a few cookies to fit them perfectly; the goal is to create a uniform base. Once the cookie layer is complete, grab your sliced bananas. Arrange the banana slices in a single, even layer on top of the cookies. Aim for a consistent thickness, as this will ensure that each bite has a perfect balance of banana flavor. The bananas add a touch of natural sweetness and a wonderful soft texture to the dessert.
Step 2: Mix the Pudding
Now, let's move on to creating the creamy pudding layer. In a medium-sized bowl, pour in 2 cups of whole milk. The whole milk adds richness and helps create a smooth, creamy texture. Add the contents of the 5 oz. box of instant French Vanilla pudding to the milk. This instant pudding mix is a convenient way to achieve a delicious and consistent pudding base. Using a handheld electric mixer, begin blending the milk and pudding mixture on medium speed. Continue mixing until the mixture is well combined and starts to thicken. This usually takes about 2-3 minutes. Make sure there are no lumps and the pudding has a smooth, creamy consistency. This pudding mixture will serve as the foundation for our creamy filling. Once the pudding is ready, set the bowl aside while you prepare the next part of the filling.
Step 3: Prepare the Cream Cheese Mixture
In a separate bowl, we'll create the rich and tangy cream cheese mixture. Start by adding the 8 oz. package of softened cream cheese to the bowl. Make sure the cream cheese is softened to room temperature before using it; this will ensure that it mixes smoothly and evenly. Add the 14 oz. can of sweetened condensed milk to the bowl with the cream cheese. The sweetened condensed milk adds a luscious sweetness and helps create a velvety texture. Using the electric mixer again, beat the cream cheese and sweetened condensed milk together on medium speed until the mixture is smooth and creamy. Continue mixing for about 3-4 minutes, scraping down the sides of the bowl as needed to ensure that all the ingredients are fully incorporated. The result should be a silky, decadent cream cheese mixture that is ready to be combined with the pudding.
Step 4: Fold in the Whipped Topping
This step is crucial for achieving the light and airy texture of our Banana Cream Dream. Grab your thawed whipped topping and gently add it to the cream cheese mixture. If you're using sweetened whipped cream instead of the frozen whipped topping, make sure it is well whipped to achieve the desired lightness. Using a rubber spatula, gently fold the whipped topping into the cream cheese mixture. Be careful not to overmix; you want to maintain the light and airy texture of the whipped topping. Overmixing can cause the whipped topping to deflate, resulting in a denser filling. Continue folding until the whipped topping is just incorporated and the mixture is uniform in color and texture. This step combines the creaminess of the cream cheese with the fluffy texture of the whipped topping, creating a decadent and smooth filling that will melt in your mouth.
Step 5: Combine the Mixtures
Now it's time to bring all the components together to create the final creamy layer. Carefully add the cream cheese mixture to the bowl with the pudding mixture. Gently stir these two mixtures together until they are fully combined and smooth. Make sure there are no streaks of cream cheese or pudding; the mixture should be uniform in color and texture. This final creamy layer will be poured over the cookies and bananas, creating a luscious and decadent base for the remaining toppings.
Step 6: Assemble the Dessert
Carefully pour the creamy mixture over the layer of bananas and cookies in the dish. Use a spatula to spread it evenly, ensuring that it covers the entire surface. This even distribution is important for ensuring that every bite of the dessert is equally delicious. Once the filling is evenly distributed, grab the remaining cookies from the second bag. Arrange the cookies on top of the creamy filling, creating another layer of delightful crunch. You can arrange the cookies in rows or create a more decorative pattern, depending on your preference. The cookies on top will not only provide a satisfying texture but also make the dessert visually appealing.
Step 7: Chill and Serve
The final step is to refrigerate the assembled dessert for at least a few hours, or preferably overnight. Chilling allows the flavors to meld together and the layers to set properly. This waiting period is essential for achieving the perfect texture and flavor balance. Once the dessert has chilled, it’s ready to be served! Cut into squares and enjoy! The result is a dessert that is cool, creamy, and bursting with flavor, a true Banana Cream Dream.
