Step 1: Preheat Oven & Prepare Pan
Preheat your oven to 350°F (175°C). Grease and line the bottom of a 9-inch springform pan with parchment paper. This ensures the cake releases easily after baking and creates a clean presentation. I prefer to grease the pan with a baking spray that contains flour for even easier release.
Step 2: Combine Dry Ingredients for Cake
In a large bowl, sift together the all-purpose flour, granulated sugar, baking powder, baking soda, salt, and cocoa powder. Sifting is an important step for achieving a light and tender cake. It eliminates any lumps in the dry ingredients and ensures they are evenly distributed throughout the batter. The cocoa powder provides the subtle chocolate flavor that characterizes red velvet cake.
Step 3: Combine Wet Ingredients for Cake
In another bowl, whisk together the vegetable oil, buttermilk (at room temperature!), eggs (at room temperature!), red food coloring, vanilla extract, and white vinegar until smooth. Ensure all ingredients are well incorporated. Buttermilk adds moisture and a slight tang that complements the sweetness of the cake. The combination of red food coloring and cocoa powder gives the cake its signature red hue. Vinegar helps activate the baking soda, contributing to a light and airy texture. Room temperature ingredients blend better and help create a smoother batter.
Step 4: Combine Wet and Dry Ingredients
Gradually add the dry ingredients to the wet mixture, stirring until just combined. Be careful not to overmix, as this can develop the gluten in the flour and result in a tough cake. Mix until the dry ingredients disappear into the wet mixture, and no streaks of flour remain.
Step 5: Bake the Red Velvet Cake Base
Pour the batter into the prepared springform pan and smooth the top with a spatula. Bake for 25-30 minutes, or until a toothpick inserted in the center comes out clean. Start checking for doneness around 25 minutes, as baking times can vary depending on your oven. Once baked, let the cake cool completely in the pan before moving on to the next step.
Step 6: Soften Cream Cheese
While the cake is baking and cooling, prepare the cheesecake filling. Ensure your cream cheese is completely softened to room temperature. This is crucial for achieving a smooth and creamy cheesecake filling. If the cream cheese is cold, it will create lumps in the filling.
Step 7: Create the Cheesecake Base
In a large mixing bowl, beat the softened cream cheese until smooth and creamy using an electric mixer (stand or hand mixer). Gradually add the powdered sugar and vanilla extract, mixing until fully incorporated. Powdered sugar sweetens the filling without adding any graininess. Vanilla extract enhances the flavor of the cream cheese and strawberry.
Step 8: Prepare Strawberry Puree
Wash and hull about 8-10 fresh strawberries. Puree them in a food processor or blender until smooth. This creates the fresh strawberry flavor and beautiful color for the cheesecake filling.
Step 9: Incorporate Strawberry Puree
Stir in the pureed strawberries into the cheesecake base, ensuring everything is well combined. The strawberry puree should be evenly distributed throughout the filling to create a consistent flavor.
Step 10: Whip the Heavy Cream
In a separate bowl, whip the heavy cream until stiff peaks form. This creates the light and airy texture of the cheesecake filling. Be careful not to overwhip the cream, as it can turn grainy.
Step 11: Fold in the Whipped Cream
Gently fold the whipped cream into the strawberry cheesecake mixture until light and fluffy. Folding preserves the air in the whipped cream, resulting in a light and airy cheesecake filling.
Step 12: Assemble the Cheesecake
Once the red velvet cake has cooled completely, carefully remove it from the springform pan and place it on your serving dish or a cake stand.
Step 13: Add the Filling
Spread the strawberry cheesecake filling evenly on top of the red velvet cake. Use an offset spatula to create a smooth and even layer.
Step 14: Chill the Cheesecake
Place the cheesecake in the refrigerator and chill for at least 4 hours, or preferably overnight, until the filling is set. This allows the cheesecake filling to firm up and the flavors to meld together.
Step 15: Garnish and Serve
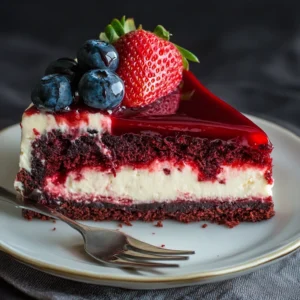
Before serving, garnish with fresh strawberry halves on top. You can also add a dollop of whipped cream for an extra touch of decadence. Slice and serve cold.
